
UPDATE 3/1/25 - Modified ‘deploy7.sh’ to improve reliability when accessing most corporate websites in kind for a little bit less security, by turning off ‘harden-large-queries: no’ e.g. ‘no’ instead of ‘yes,’ prior. These security reductions, I feel, are the fault of the corporate websites and so if you desire more security go ahead and turn this setting back to ‘yes.’
UPDATE 3/6/25: Added option or Version B.
Don’t Trust Cloudflare?
We understand Completely. Check this guide out instead
What is this?
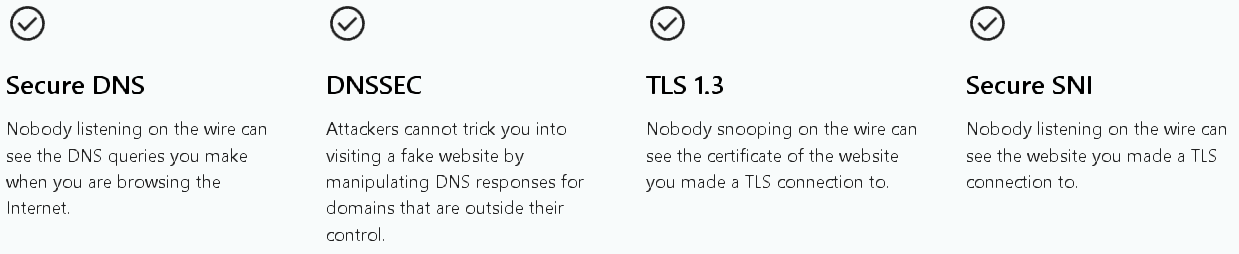
This is a Bash script that configures a privacy-focused DNS and proxy system using Unbound (for DNS resolution), Tor (for anonymity and routing), and iptables (for network redirection). It ensures all DNS queries go through DNS over TLS (DoT) and Tor while integrating Encrypted Client Hello (ECH) for improved privacy. Thanks to Cloudflare, this suite natively supports: Secure DNS, DNSSEC, TLS 1.3, Secure SNI with Tor undertones.
For IP address masking, consider using also a VPN and/or running your browser in Tor mode.
Prerequisites:
Proxmox Installed on your dedicated homelab host
Get Started:
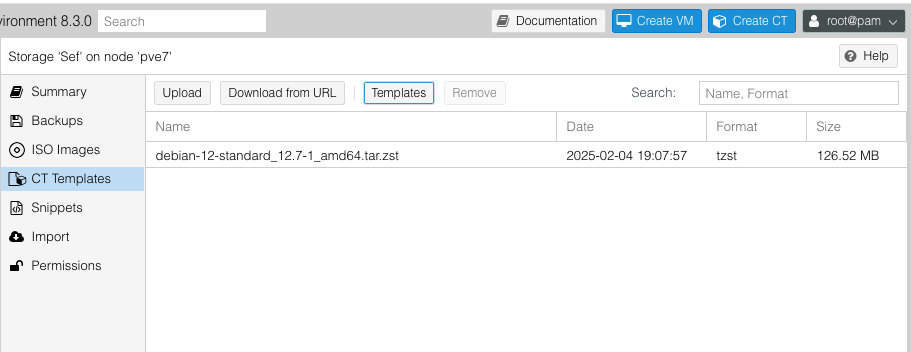
Create a new LXC container using the template Debian. Ubuntu probably also works just fine.
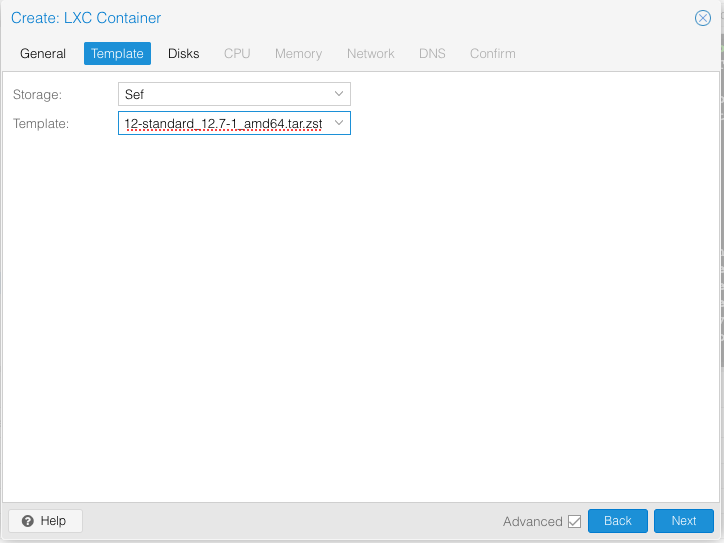
First you need to have the debian template loaded into your filesystem. Click on your filesystem → CT Templates → Templates → Debian
Now that your prerequisites are out of the way, click Create CT

Fill out your desired credentials, click next

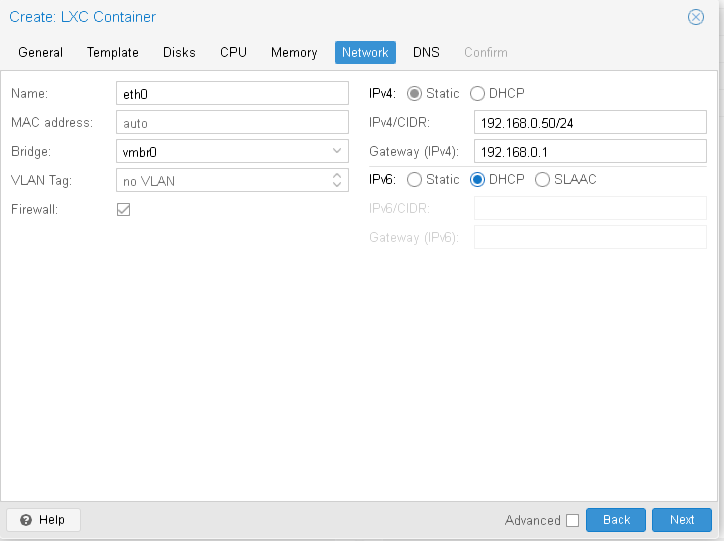
I recommend the following network config, to start. Click next
ONCE INSIDE THE LXC’s SHELL -
apt install sudo
deploy1.sh
#!/bin/bash
set -e

echo "zchg.org zchg.org zchg.org zchg.org zchg.org zchg.org zchg.org zchg.org"
echo " zchg.org zchg.org zchg.org zchg.org zchg.org zchg.org zchg.org zchg.org"
echo "zchg.org zchg.org zchg.org zchg.org zchg.org zchg.org zchg.org zchg.org"
echo " zchg.org zchg.org zchg.org zchg.org zchg.org zchg.org zchg.org zchg.org"
echo "zchg.org zchg.org zchg.org zchg.org zchg.org zchg.org zchg.org zchg.org"
echo " zchg.org zchg.org zchg.org zchg.org zchg.org zchg.org zchg.org zchg.org"
echo "zchg.org zchg.org zchg.org zchg.org zchg.org zchg.org zchg.org zchg.org"
echo " zchg.org zchg.org zchg.org zchg.org zchg.org zchg.org zchg.org zchg.org"

echo "[+] Updating system..."
apt update && apt upgrade -y

echo "[+] Installing dependencies..."
apt install curl

# Install Pi-hole with option to skip OS check for compatibility
sudo PIHOLE_SKIP_OS_CHECK=true curl -sSL https://install.pi-hole.net | bash && apt install -y iptables-persistent unbound tor avahi-daemon avahi-utils jq

echo "[+] Configuring Unbound..."
cat > /etc/unbound/unbound.conf <<EOL
server:
    interface: 127.0.0.1
    interface: ::1
    access-control: 127.0.0.1 allow
    access-control: ::1 allow
    port: 5335
    do-ip4: yes
    do-ip6: yes
    do-udp: yes
    do-tcp: yes
    hide-identity: yes
    hide-version: yes
    forward-zone:
        name: "."
        forward-addr: 127.0.0.1@9053
EOL

# Add DNSSEC validation to Unbound from Script 2
echo "[+] Adding DNSSEC validation to Unbound..."
cat > /etc/unbound/unbound.conf.d/pi-hole.conf <<EOL
server:
    verbosity: 1
    interface: 0.0.0.0
    port: 5353  # Changed from default to prevent conflicts
    do-ip4: yes
    do-ip6: yes
    do-udp: yes
    do-tcp: yes
    access-control: 0.0.0.0/0 allow
    access-control: ::0/0 allow
    cache-max-ttl: 86400
    cache-min-ttl: 3600
    harden-dnssec-stripped: yes
    use-caps-for-id: no
    prefetch: yes
    num-threads: 2
    so-reuseport: yes
    msg-cache-size: 128m
    rrset-cache-size: 256m
    infra-cache-numhosts: 100000
    infra-cache-lame-size: 10k
    neg-cache-size: 4m
    do-not-query-localhost: no
    hide-identity: yes
    hide-version: yes
    qname-minimisation: yes
    harden-glue: yes
    harden-below-nxdomain: yes
    target-fetch-policy: "2 1 0 0 0"
    val-log-level: 1
    tls-cert-bundle: "/etc/ssl/certs/ca-certificates.crt"
EOL

echo "[+] Configuring Pi-hole..."
cat > /etc/dnsmasq.d/02-custom.conf <<EOL
server=127.0.0.1#5335
server=::1#5335
no-resolv
EOL
systemctl restart pihole-FTL unbound

echo "[+] Configuring Tor Hidden Service..."
mkdir -p /var/lib/tor/pihole
chown -R debian-tor:debian-tor /var/lib/tor/pihole
chmod 700 /var/lib/tor/pihole
cat > /etc/tor/torrc <<EOL
HiddenServiceDir /var/lib/tor/pihole/
HiddenServicePort 53 127.0.0.1:53
HiddenServicePort 80 127.0.0.1:80
HiddenServicePort 9053 127.0.0.1:9053
AutomapHostsOnResolve 1
DNSPort 127.0.0.1:9053
TransPort 9040
SocksPort 127.0.0.1:9050

# Force all traffic through Tor
VirtualAddrNetworkIPv4 10.192.0.0/10
AutomapHostsSuffixes .onion,.exit
TransListenAddress 0.0.0.0
DNSListenAddress 0.0.0.0
EOL

echo "[+] Restarting Tor..."
systemctl restart tor

echo "[+] Enabling Avahi for local discovery..."
systemctl enable avahi-daemon
systemctl restart avahi-daemon

echo "[+] Waiting for Tor Hidden Service to be available..."
sleep 20
ONION_ADDR=$(cat /var/lib/tor/pihole/hostname)

echo "[+] Registering local and remote peers..."
PEER_FILE="/etc/pihole/nodes.conf"
avahi-browse -rt _pihole._tcp | grep "=" | awk '{print $6}' > $PEER_FILE
echo "tor://$ONION_ADDR" >> $PEER_FILE

while read -r NODE; do
    echo "Discovered node: $NODE"
    curl -s "http://$NODE/peers" >> $PEER_FILE || true
done < $PEER_FILE

echo "[+] Updating Unbound configuration..."
UNBOUND_CONF="/etc/unbound/unbound.conf"

# Ensure localhost queries are allowed
sed -i 's/do-not-query-localhost: yes/do-not-query-localhost: no/g' $UNBOUND_CONF

# Remove any existing forward zone configuration to prevent duplication
sed -i '/forward-zone:/,/^$/d' $UNBOUND_CONF

# Add new forward rules
cat >> $UNBOUND_CONF <<EOL
forward-zone:
    name: "."
    forward-addr: 127.0.0.1@9053
EOL

echo "[+] Restarting Unbound..."
systemctl restart unbound

echo "[+] Installing iptables-persistent..."
apt install -y iptables-persistent

echo "[+] Configuring iptables to force all traffic through Tor..."
iptables -F
iptables -X
iptables -t nat -F
iptables -t nat -X

# Allow local traffic
iptables -A OUTPUT -o lo -j ACCEPT

# Allow Tor process to connect to the internet
iptables -A OUTPUT -m owner --uid-owner debian-tor -j ACCEPT

# Redirect DNS requests to Tor
iptables -t nat -A OUTPUT -p udp --dport 53 -j REDIRECT --to-ports 9053
iptables -t nat -A OUTPUT -p tcp --dport 53 -j REDIRECT --to-ports 9053

# Redirect all traffic to Tor except local (127.0.0.1) and LAN (192.168.0.0/16)
iptables -t nat -A OUTPUT -d 127.0.0.1 -j RETURN
iptables -t nat -A OUTPUT -d 192.168.0.0/16 -j RETURN
iptables -t nat -A OUTPUT -p tcp --syn -j REDIRECT --to-ports 9040

# Drop all non-Tor traffic to prevent leaks
iptables -A OUTPUT -m state --state ESTABLISHED,RELATED -j ACCEPT
iptables -A OUTPUT -j REJECT

# Save iptables rules
iptables-save > /etc/iptables/rules.v4
echo "[+] iptables rules set!"

iptables -F
iptables -t nat -F
iptables -t nat -A OUTPUT -p tcp --dport 80 -j REDIRECT --to-port 9040
iptables -t nat -A OUTPUT -p tcp --dport 443 -j REDIRECT --to-port 9040
iptables -t nat -A OUTPUT -p udp --dport 53 -j REDIRECT --to-port 9053

iptables-save > /etc/iptables.rules

netfilter-persistent save
netfilter-persistent reload
systemctl enable netfilter-persistent

echo "[+] Script completed."

sleep 5

reboot
sudo nano deploy1.sh
APPLE or CTRL + v, or right click to paste in our nano file
CTRL + X
Y
chmod +x deploy1.sh
sudo ./deploy1.sh
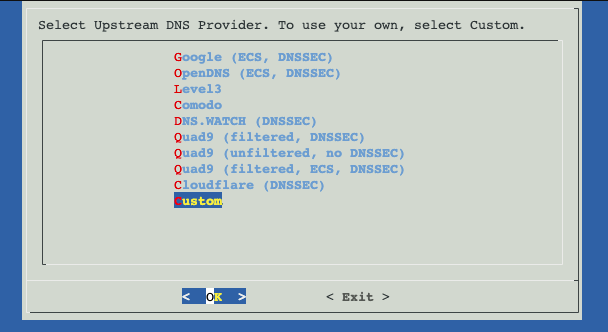
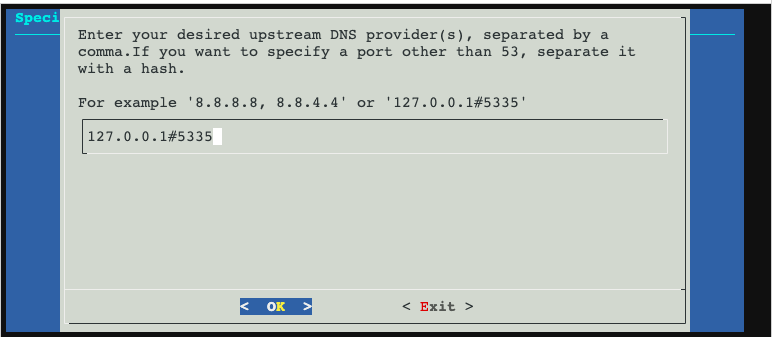
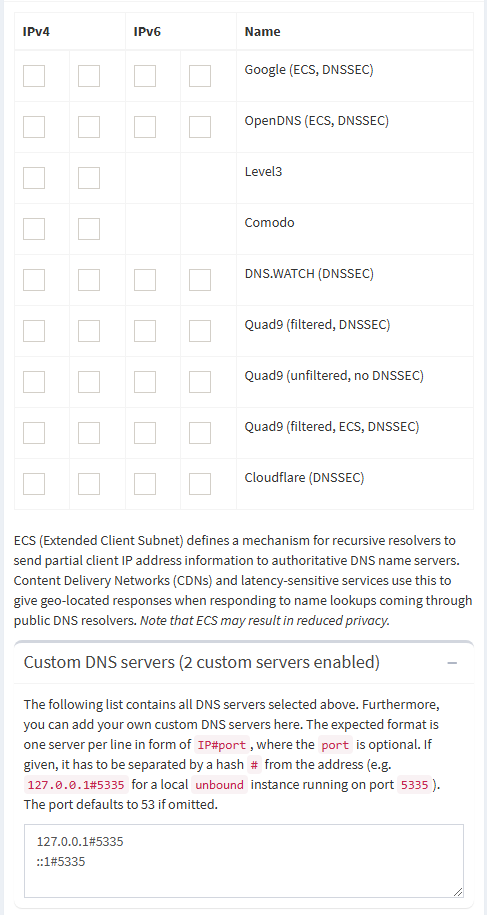
Now for PiHole default everything, except for upstream DNS you will select custom, then fill it out like so. YOU MUST DO THIS if you want recursive DNS!
DON’T FORGET TO WRITE DOWN YOUR PASSWORD!
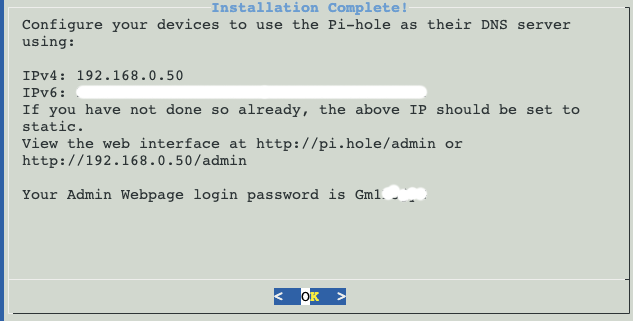
… but if you do forget your password, you can later use command
sudo pihole setpassword [pwd]
Yes to both IPV4 and IPV6, which again is simply your default:
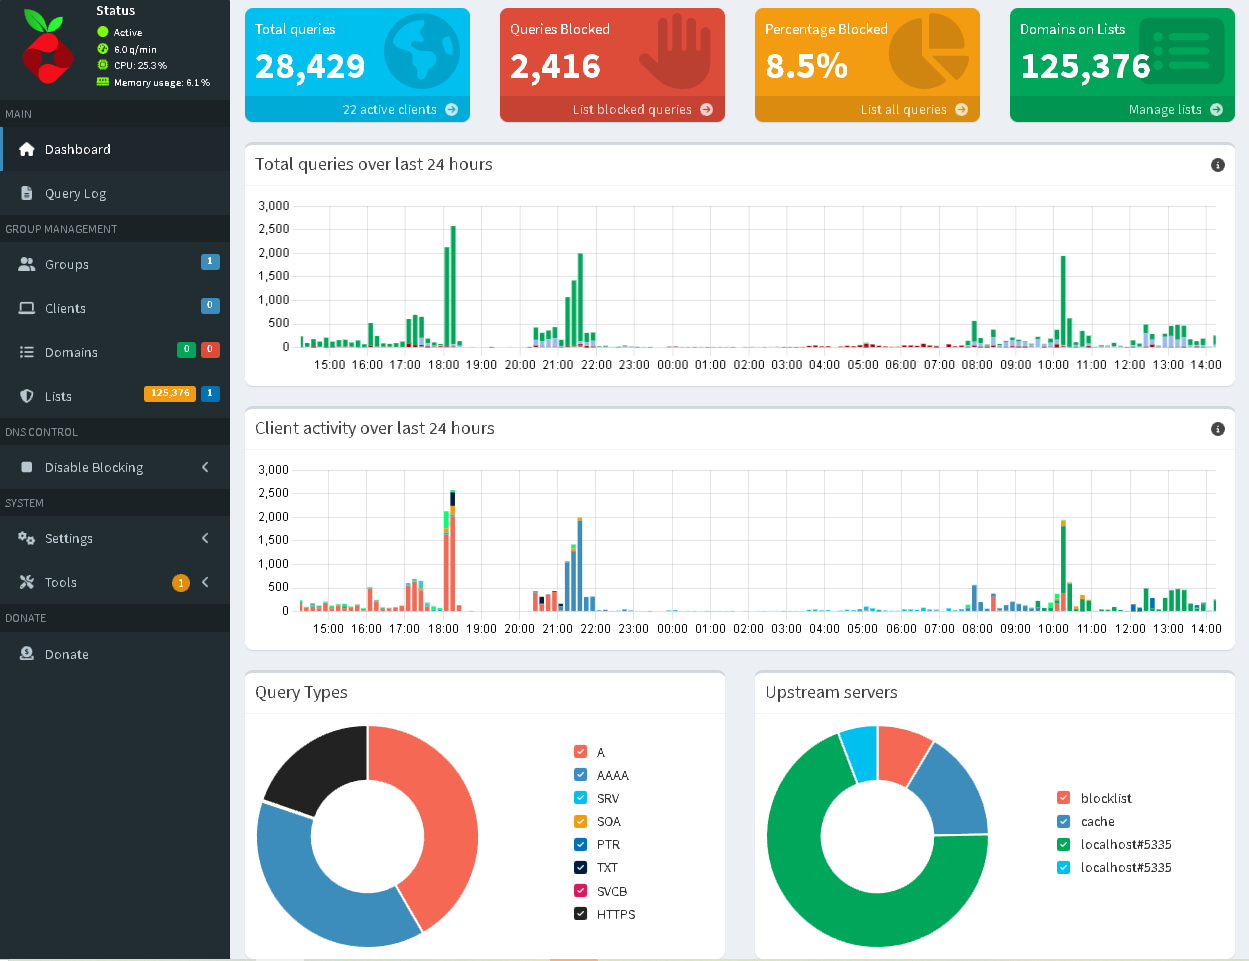
Once complete, open the IPV4 in the URL bar of browser on your other computer. PLEASE NOTE: YOU MAY SOMETIMES NEED TO BE IN PRIVATE (INCOGNITO) MODE to guarantee operation of the Pihole UI. That’s easy, just right click Brave (Chrome) → New Private Window. In my case the URL (from the screenshot above) was 192.168.0.50/admin, but your might have chosen a different static IP address (again, from above)
Would you like to know more? We have more information over here.
Now you’re ready to run ‘deploy7.sh’
Deploy7.sh
#!/bin/bash
set -e

echo "[+] Updating system and installing dependencies..."
apt update && apt upgrade -y
apt install -y curl unbound tor iptables-persistent dnsutils

echo "[+] Configuring Unbound for DNS over TLS with ECH support..."
cat > /etc/unbound/unbound.conf <<EOL
server:
    verbosity: 1                    # Increase logging for debugging
    interface: 127.0.0.1
    port: 5335
    do-ip4: yes
    do-ip6: yes
    do-udp: yes
    do-tcp: yes
    tls-use-sni: yes               # Enable SNI handling for ECH
    hide-identity: yes
    hide-version: yes
    do-not-query-localhost: no
    harden-glue: yes
    harden-dnssec-stripped: yes
    harden-large-queries: no
    harden-referral-path: yes
    harden-short-bufsize: yes
    harden-algo-downgrade: yes
    harden-below-nxdomain: yes
    use-caps-for-id: no
    aggressive-nsec: yes
    qname-minimisation: yes
    prefetch: yes
    prefetch-key: yes
    so-rcvbuf: 4m
    so-sndbuf: 4m
    num-threads: $(nproc)
    cache-min-ttl: 3600
    cache-max-ttl: 86400
    tls-cert-bundle: /etc/ssl/certs/ca-certificates.crt

forward-zone:
    name: "."
    forward-tls-upstream: yes      # Enable DNS over TLS for upstream
    forward-addr: 127.0.0.1@9053  # Force all queries through Tor's DNSPort
    forward-addr: ::1@9053 # Force all IPV6 queries through Tor's DNSPort
    forward-addr: 1.1.1.1@853      # Cloudflare DoT with ECH
    forward-addr: 1.0.0.1@853
    forward-addr: 2606:4700:4700::1111@853
    forward-addr: 2606:4700:4700::1001@853

remote-control:
    control-enable: no
EOL

echo "[+] Configuring Tor for SOCKS proxy and DNS..."
cat > /etc/tor/torrc <<EOL
SocksPort 9050
DNSPort 9053
AutomapHostsOnResolve 1
VirtualAddrNetworkIPv4 10.192.0.0/10
VirtualAddrNetworkIPv6 [fc00::/8]
AutomapHostsSuffixes .onion

ExitNodes {us},{ca} StrictNodes 0
AvoidDiskWrites 1
HardwareAccel 1
TransPort 9040
TransListenAddress 127.0.0.1
EOL

echo "[+] Setting Tor as a systemd service..."
systemctl enable tor
systemctl restart tor

echo "[+] Configuring Unbound to route through Tor..."
cat > /etc/unbound/unbound.conf.d/tor.conf <<EOL
server:
    do-not-query-localhost: no

forward-zone:
    name: "."
    forward-tls-upstream: yes
    forward-addr: 127.0.0.1@9050   # Route via Tor SOCKS5
EOL

echo "[+] Validating Unbound configuration..."
unbound-checkconf || { echo "[-] Unbound config error detected!"; exit 1; }

echo "[+] Restarting Unbound..."
systemctl enable unbound
systemctl restart unbound

echo "[+] Setting up iptables rules..."
iptables -t nat -F  # Flush existing NAT rules to avoid conflicts
iptables -t nat -A OUTPUT -p udp --dport 53 -j REDIRECT --to-ports 5335
iptables -t nat -A OUTPUT -p tcp --dport 53 -j REDIRECT --to-ports 5335
iptables -t nat -A OUTPUT -p tcp --dport 853 -j REDIRECT --to-ports 9040
iptables -t nat -A OUTPUT -p udp --dport 853 -j REDIRECT --to-ports 9040
iptables -t nat -A OUTPUT -d 127.0.0.1 -p udp --dport 53 -j ACCEPT
iptables -t nat -A OUTPUT -d 127.0.0.1 -p tcp --dport 53 -j ACCEPT

echo "[+] Saving iptables rules..."
iptables-save > /etc/iptables/rules.v4
systemctl enable netfilter-persistent
systemctl restart netfilter-persistent

echo "[+] Verifying services..."
sleep 5
if systemctl is-active tor >/dev/null; then
    echo "[+] Tor is running"
else
    echo "[-] Tor failed to start. Check: journalctl -u tor"
    exit 1
fi
if systemctl is-active unbound >/dev/null; then
    echo "[+] Unbound is running"
else
    echo "[-] Unbound failed to start. Check: journalctl -u unbound"
    exit 1
fi

echo "[+] Testing DNS resolution..."
dig_result=$(dig @127.0.0.1 -p 5335 example.com +short)
if [ -n "$dig_result" ]; then
    echo "[+] DNS resolution successful: $dig_result"
else
    echo "[-] DNS resolution failed. Check logs and steps below."
fi

echo "[+] Configuration applied. Debugging steps if needed:"
echo "1. Check Unbound logs: journalctl -u unbound -b"
echo "2. Check Tor logs: journalctl -u tor -b"
echo "3. Test direct resolution: dig @1.1.1.1 -p 853 +tls example.com"
echo "4. Test Tor routing: torsocks dig @1.1.1.1 example.com"
echo "[!] If using Pi-hole, disable DNSSEC and set upstream to 127.0.0.1#5335"
echo "[!] Verify ECH: https://www.cloudflare.com/ssl/encrypted-sni/"
sudo nano deploy7.sh
chmod +x deploy7.sh
sudo ./deploy7.sh
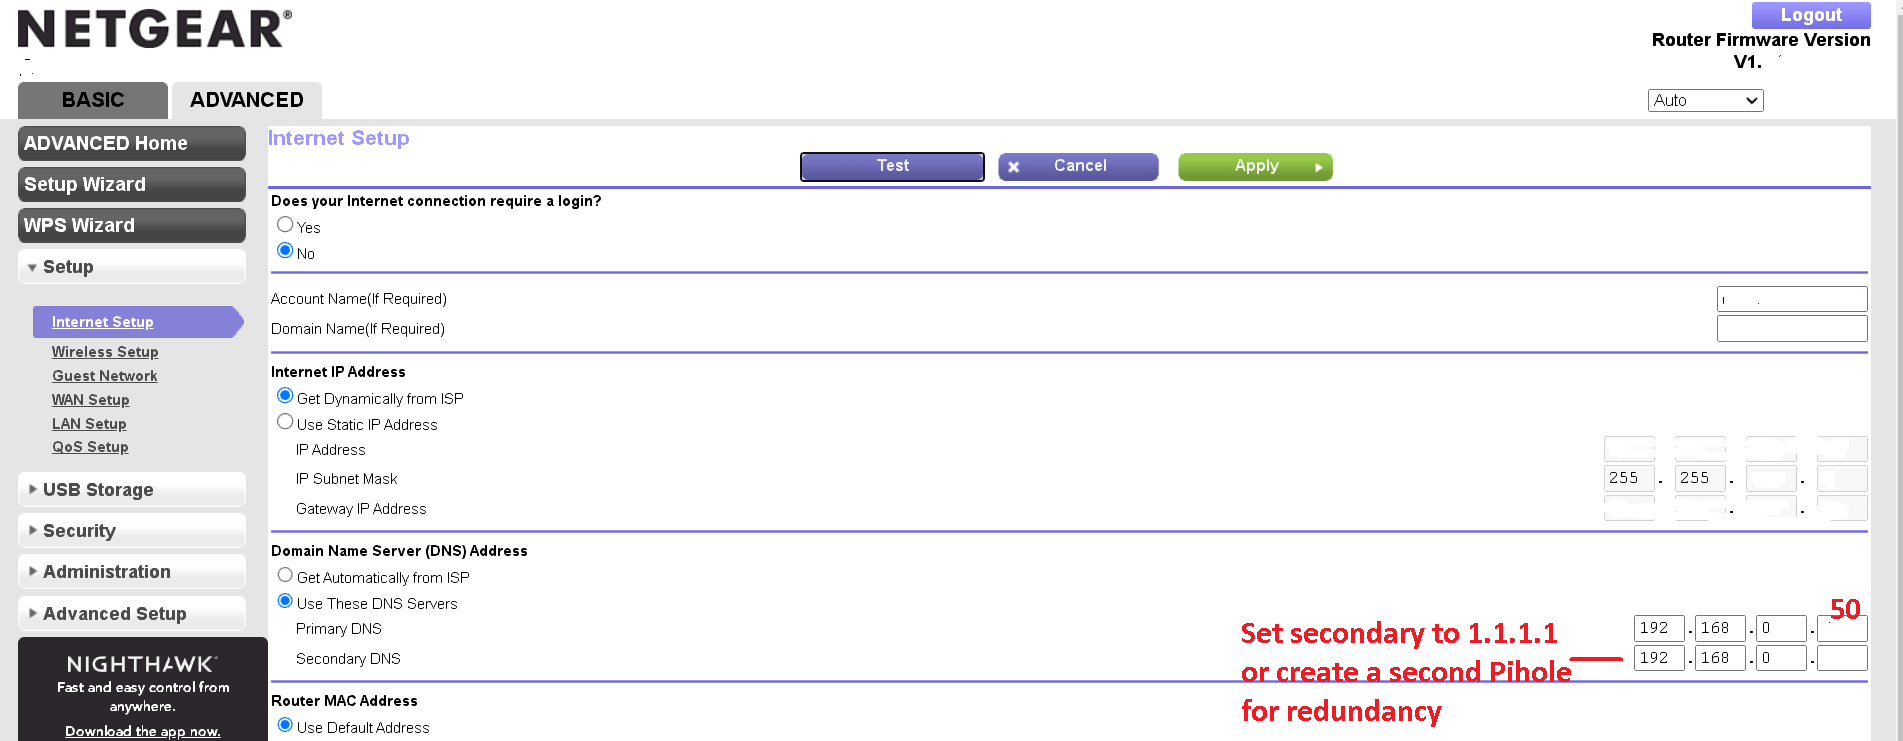
Point Your Router’s DNS to Your Pihole
Now go to your router’s URL. This is usually 192.168.0.1 OR 192.168.1.1. Find your DNS settings and change your primary DNS to 192.168.0.50 as in our example (or whatever static IP you had chosen for your Pihole). You can create a second Pihole if you wish to have redundancy.
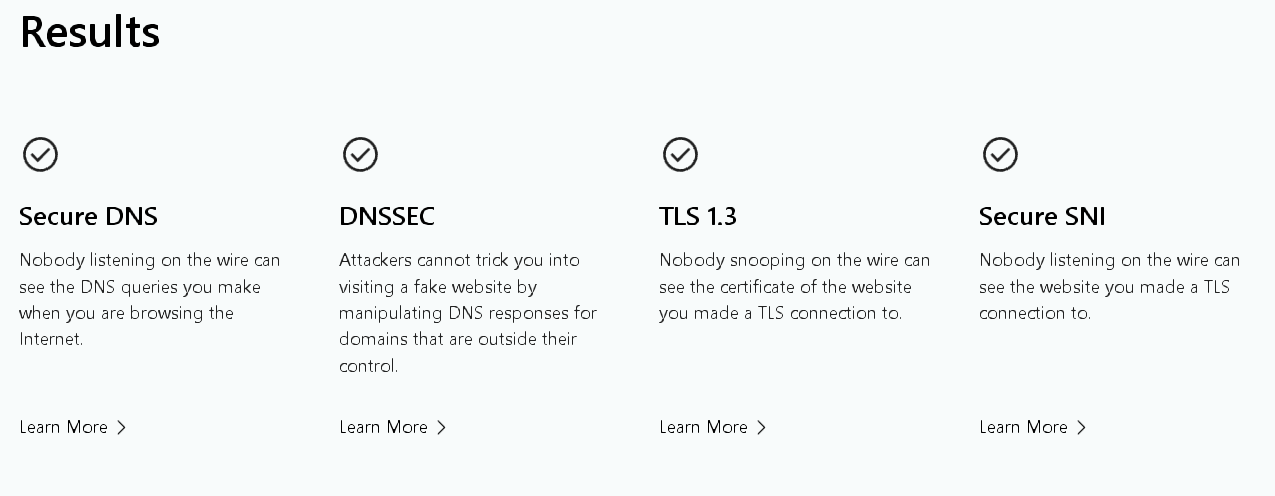
Results
Please note: Your browser MUST support SNI to pass SNI test!
Static IPV6 (optional)
For IPV6 support, don’t forget to add the following to your list of custom DNS hosts…
::1#5335
A common approach is establishing your IPV6 address as static. I sort of abhor IPV6. It’s supposed to be native DHCP but you need to have a static IPV6 to guarantee things will play nice? Backwards… NEwhoosies…
It really is optional to set up IPV6. Proceed only if you are advanced…
If you followed my guide correctly, you will have assigned DHCP to your IPV6 during installation. Now it’s time to change it to a static.
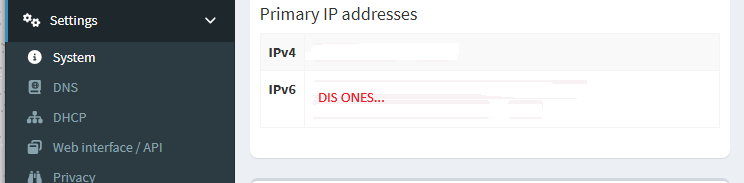
You can sniff out your DHCP IPV6 using the Pihole user interface (settings → system) and use it as your inspiration for your static IPV6…
… and yes, you can also use the “ip address” command, all you old schoolies…
ip address
Now you can paste your inspired IPV6 into your router’s upstream DNS settings for IPV6… Note: all routers will hide this somewhere different. For my router, it was an afterthought, they added it after the thought, so it was hidden quite well…
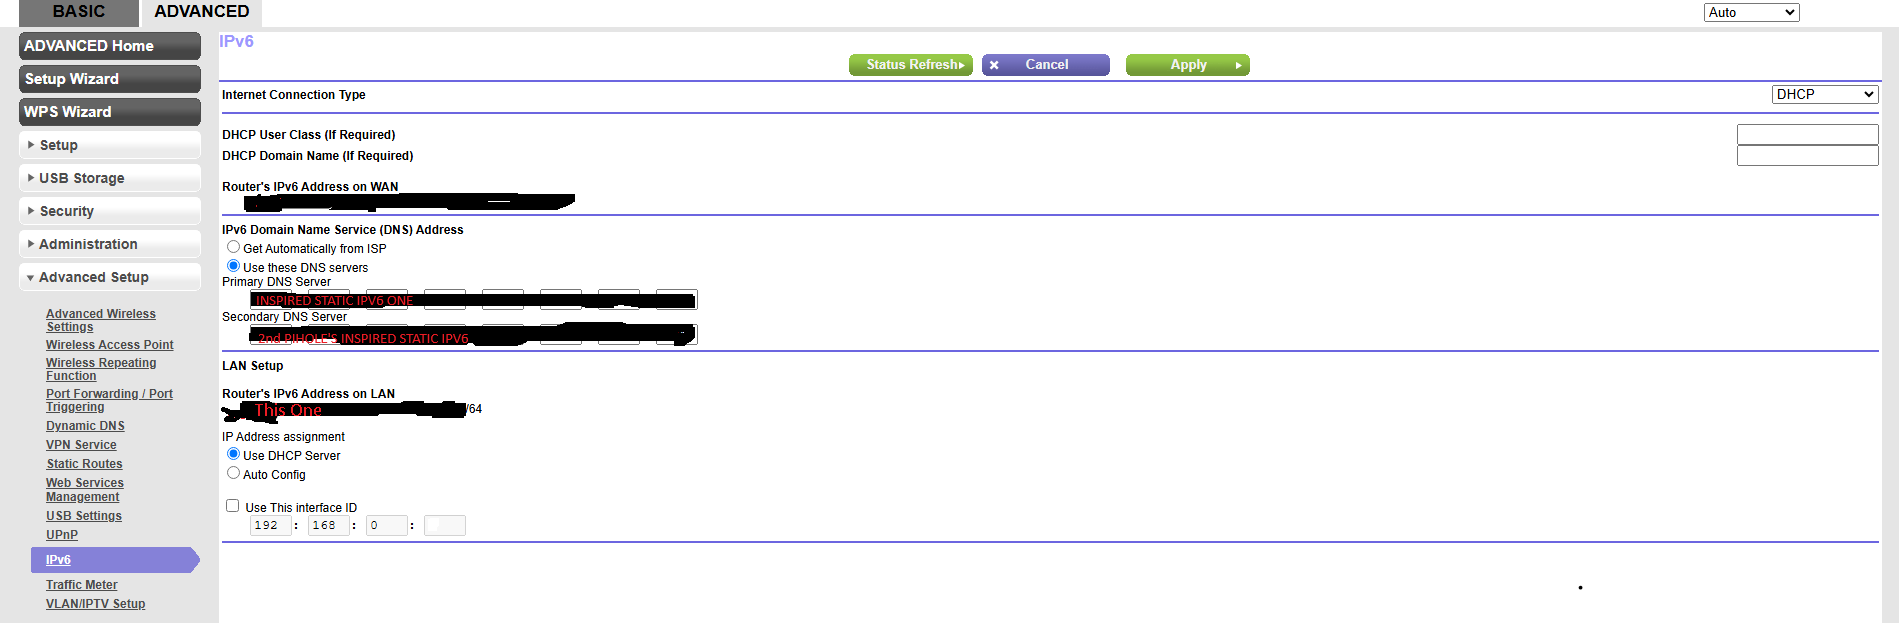
But before restarting your router, you will need to make sure the DHCP IPV6 of the pihole is converted to a Static IP address in Proxmox:
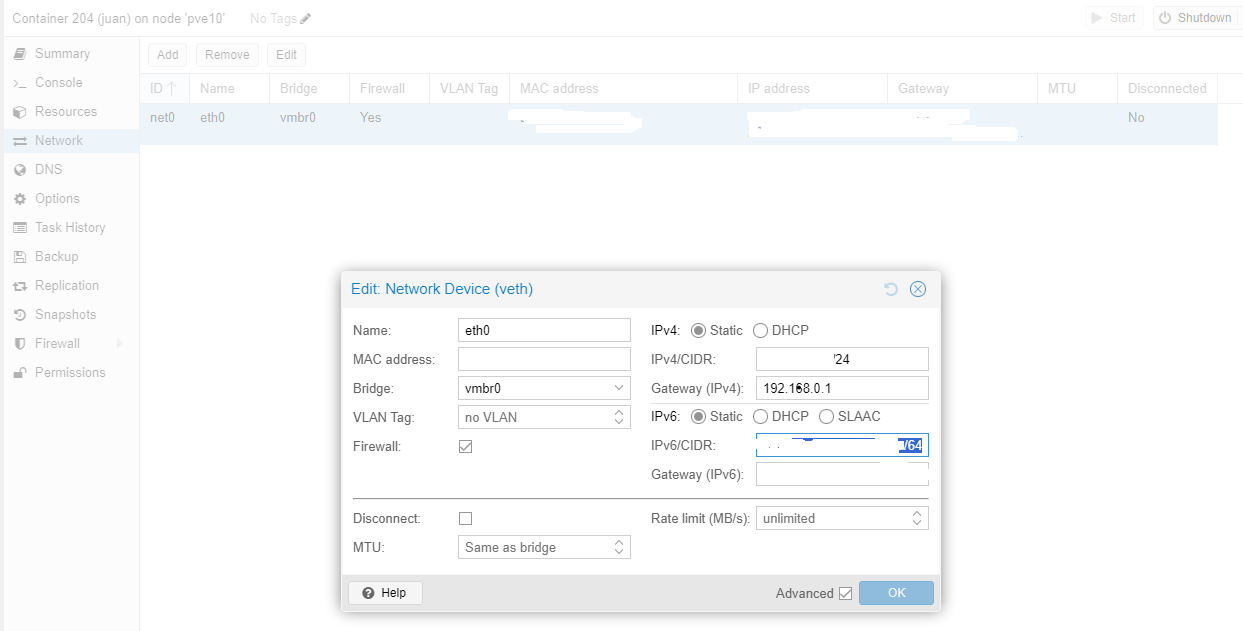
You must ADD a /64 or something like this after your Static IP address. You must REMOVE the /64 from the LOCAL IPV6 that we copied from our router’s information page in order to assign the router as your IPV6 Gateway.
Don’t forget to enable IPV6 in your Pihole’s DHCP settings…
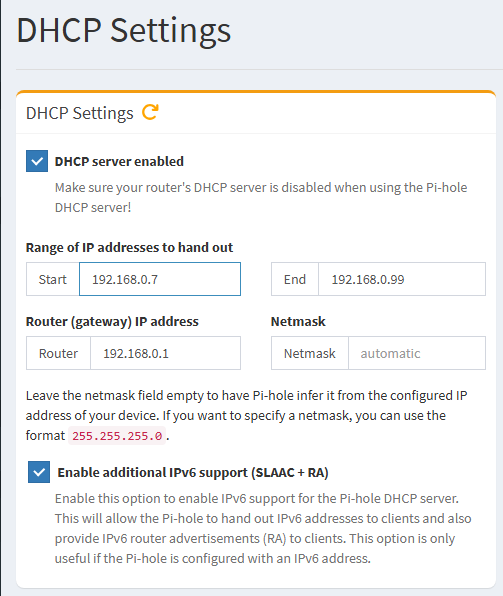
I know this isn’t proper, but I like to leave a few slots open on my router’s DHCP then assign the rest to my pihole. You can see that mutiple piholes can split DHCP so that there are in fact three DHCP servers not fighting each other. I know, I know you’re supposed to disable DHCP on your router so they don’t fight, but are they really just suggesting that so that you don’t confuse yourself? Any case, if you don’t want to go through a DNS down event destroying your whole network, consider something closer to what I’ve done here?
(for example):
Router → 192.168.0.2 - 192.168.0.7
Pihole1 → 192.168.0.8 - 192.168.0.99
Pihole 2 → 192.168.0.100 - 192.168.0.254
Something even more exciting?
Router → 192.168.0.2 - 192.168.0.254
Pihole1 → 192.168.1.1 - 192.168.1.254
Pihole 2 → 192.168.2.1 - 192.168.2.254
How does it work?
- System Update & Dependency Installation
- Updates the system (
apt update && apt upgrade -y) - Installs required packages:
curl,unbound,tor,iptables-persistent,dnsutils.
- Configures Unbound as a DNS Resolver
- Listens on
127.0.0.1:5335. - Uses DNS over TLS (DoT) for encrypted queries.
- Supports ECH (Encrypted Client Hello) to prevent hostname leaks.
- Configured to forward DNS requests through Tor (port 9053) and fallback to Cloudflare (1.1.1.1:853).
- Configures Tor as a SOCKS Proxy & DNS Handler
- Sets up SOCKS proxy on port 9050.
- Configures Tor to resolve DNS queries on port 9053.
- Implements exit node preferences (US & Canada).
- Enables transparency routing (port 9040) for deeper Tor integration.
- Integrates Unbound with Tor
- Adds a secondary Unbound config to force DNS resolution through Tor SOCKS5 (9050).
- Configures iptables Firewall Rules
- Redirects all system DNS queries (port 53) to Unbound (
127.0.0.1:5335). - Redirects DoT queries (port 853) to Tor (
127.0.0.1:9040). - Ensures localhost traffic is exempt from forced redirection.
- Enables & Validates Services
- Starts and enables
unbound,tor, andnetfilter-persistent. - Runs basic DNS resolution checks to verify functionality.
- Debugging & Instructions
- Provides troubleshooting steps for logs, direct DNS tests, and Pi-hole integration.
- Suggests testing ECH support via Cloudflare.
What’s good about it?
![]() Strong Privacy & Anonymity
Strong Privacy & Anonymity
- All DNS queries are encrypted using DNS over TLS (DoT).
- Traffic is routed through Tor, preventing ISPs from monitoring DNS requests.
- Supports ECH, making it harder for networks to inspect encrypted requests.
![]() Resilient DNS Configuration
Resilient DNS Configuration
- Unbound caching reduces latency and improves DNS reliability.
- Multiple fallback providers (Tor, Cloudflare) ensure uptime.
![]() System-Wide DNS Enforcement
System-Wide DNS Enforcement
- Uses iptables to force all applications (even those ignoring system settings) to use secure DNS.
![]() Automated Setup & Debugging
Automated Setup & Debugging
- Script installs everything and validates Unbound and Tor.
- Provides debugging steps in case of failures.
![]() Minimal Performance Overhead
Minimal Performance Overhead
- Uses hardware acceleration (
HardwareAccel 1) for Tor. - Unbound optimizations (caching, prefetching, DNSSEC hardening).
What are its weaknesses?
![]() Potentially Slower Performance
Potentially Slower Performance
- Routing DNS through Tor adds latency.
- Using Cloudflare as a fallback reduces privacy but improves speed.
![]() Exit Nodes Could be Unreliable
Exit Nodes Could be Unreliable
ExitNodes {us},{ca} StrictNodes 0may cause random exits if no US/CA nodes are available.- May lead to slow or unreliable DNS resolution depending on Tor network health.
![]() Limited ECH Support
Limited ECH Support
- Not all resolvers fully support ECH, making its effectiveness uncertain.
![]() Requires Manual Firewall Adjustments
Requires Manual Firewall Adjustments
- If another firewall (like UFW) is used, the iptables rules may not persist.
- Potential conflicts with existing VPNs or security tools.
![]() Pi-hole Compatibility Requires Extra Steps
Pi-hole Compatibility Requires Extra Steps
- Users running Pi-hole must disable its DNSSEC and use
127.0.0.1#5335as the upstream resolver.
Final Thoughts
This script is a solid self-hosted privacy-enhancing DNS resolver that encrypts, anonymizes, and enforces secure DNS practices using Tor and DoT. However, it trades speed for security and requires careful firewall and system adjustments to avoid conflicts.
Systemwide LAN and Speed Adjustments
This script sets up a privacy-focused, Tor-routed DNS resolver using Unbound and Tor on a Debian-based system. Here’s a breakdown of how it works, its strengths, weaknesses, and what can be improved for LAN-wide deployment and better performance:
How It Works
- Installs Dependencies:
- Installs
curl,unbound,tor,iptables-persistent, anddnsutils.
- Configures Unbound:
- Sets Unbound to listen on
127.0.0.1:5335instead of port 53. - Enables DNS over TLS (DoT) for encrypted upstream queries.
- Uses Cloudflare (1.1.1.1) for fallback DoT queries.
- Routes all DNS queries through Tor’s DNSPort (9053) for anonymized lookups.
- Supports Encrypted Client Hello (ECH) for privacy enhancement.
- Configures Tor:
- Enables SOCKS proxy (9050) and DNSPort (9053).
- Enforces
ExitNodes {us},{ca}for geofencing. - Configures
TransPort 9040to handle transparent proxying.
- Configures iptables:
- Redirects all outgoing DNS (port 53) and DoT (port 853) traffic to Unbound (
5335). - Routes encrypted DNS through Tor’s TransPort (9040).
- Starts and Verifies Services:
- Ensures
tor,unbound, andiptablesrules are persistent. - Runs dig queries to test DNS resolution.
Strengths
![]() Privacy-Focused – Forces all DNS queries through Tor and supports DNS over TLS (DoT).
Privacy-Focused – Forces all DNS queries through Tor and supports DNS over TLS (DoT).
![]() Full Encryption – Protects against ISP snooping via DoT and ECH.
Full Encryption – Protects against ISP snooping via DoT and ECH.
![]() Transparent DNS Routing – Ensures all system-wide queries are forced through Unbound.
Transparent DNS Routing – Ensures all system-wide queries are forced through Unbound.
![]() No Disk Writes (Tor) – Reduces footprint and prevents tracking.
No Disk Writes (Tor) – Reduces footprint and prevents tracking.
![]() Automated Setup – Fully sets up services, firewall rules, and tests the configuration.
Automated Setup – Fully sets up services, firewall rules, and tests the configuration.
Weaknesses
![]() High Latency – Routing all DNS through Tor increases lookup time.
High Latency – Routing all DNS through Tor increases lookup time.
![]() Tor Exit Node Blocking – Some websites block Tor exit nodes.
Tor Exit Node Blocking – Some websites block Tor exit nodes.
![]() Limited to Single Machine – Currently applies only to the local machine.
Limited to Single Machine – Currently applies only to the local machine.
![]() CPU & Memory Usage – Unbound caching and high TLS encryption load can impact low-end hardware.
CPU & Memory Usage – Unbound caching and high TLS encryption load can impact low-end hardware.
Optimizations for LAN-Wide Deployment
To deploy this across multiple devices on your LAN, you need to extend Unbound to listen on the LAN interface and configure clients to use it.
1. Bind Unbound to LAN Interface
Modify /etc/unbound/unbound.conf:
interface: 0.0.0.0  # Listen on all network interfaces
access-control: 192.168.1.0/24 allow  # Allow LAN clients
This lets LAN devices use Unbound.
2. Advertise Unbound via DHCP
- If using a router with DNS settings, set the primary DNS to your Unbound server (e.g.,
192.168.1.2). - If using
dnsmasq, add:
dhcp-option=6,192.168.1.2
I haven’t done this yet, but if it’s giving you grief try this.
This pushes your Unbound server to all clients.
3. Improve Performance (Reduce Tor Latency)
Enable Query Caching in Unbound
Add to /etc/unbound/unbound.conf:
cache-min-ttl: 7200
cache-max-ttl: 172800
serve-expired: yes
This prevents frequent queries over Tor.
Parallelize Upstream Queries
Modify:
forward-addr: 1.1.1.1@853
forward-addr: 9.9.9.9@853
This allows load balancing between Cloudflare and Quad9.
Use DNSCrypt as an Alternative
Instead of always forcing Tor, you can configure DNSCrypt-Proxy alongside Unbound.
4. Use a Dedicated Pi-Hole for DNS Filtering
If using Pi-hole, set the upstream DNS to:
127.0.0.1#5335
Disable Pi-hole DNSSEC (since Unbound handles it) to avoid conflicts.
5. System Tweaks for Better Performance
Increase File Descriptors
Add to /etc/security/limits.conf:
* soft nofile 1048576
* hard nofile 1048576
This prevents Unbound from hitting limits under heavy load.
Enable Multi-threading for Unbound
num-threads: $(nproc)
Allows full CPU utilization.
Reduce Memory Usage
If running on low-end hardware (Raspberry Pi, VPS, etc.), reduce cache:
cache-min-ttl: 1800
cache-max-ttl: 43200
so-rcvbuf: 2m
so-sndbuf: 2m
This prevents Unbound from using excessive RAM.
Final Thoughts
![]() This script fully encrypts and anonymizes DNS using Tor + Unbound.
This script fully encrypts and anonymizes DNS using Tor + Unbound.
![]() Great for privacy-focused setups and homelab networks.
Great for privacy-focused setups and homelab networks.
![]() Can be scaled to LAN-wide use with Unbound + Pi-hole integration.
Can be scaled to LAN-wide use with Unbound + Pi-hole integration.
![]() Tor-based lookups will be slower than traditional DNS.
Tor-based lookups will be slower than traditional DNS.
![]() Some sites might block Tor-exit traffic.
Some sites might block Tor-exit traffic.
For best performance, use a hybrid approach:
- LAN clients → Unbound (Caching, DoT, DNSCrypt) → Tor (as needed).
- Fallback to trusted DoT providers like Quad9, Cloudflare, or NextDNS.
