Version 2.0 is Released & Improved
Latest Version dated 2/20/25
Feeling Pretty?
Alpha Versions are potentially more powerful, and certainly less tested…
Prefer Cloudflare?
Premise

Our cute mascot for this post isn’t performing so cutely with caching, so I recommend this tool instead.. You can also spin up ZimaOS and then spin up a Chrome container, if you grow tired of clearing cache on your own browser every five minutes… Please note: Your browser MUST support SNI to pass SNI test!
What is it?
This script is a robust and open source bash tool designed for Linux (Proxmox, Homelab) users interested in maximizing their online privacy and security. It leverages tools like Pi-hole, Unbound, and Tor to create a private, secure, and ad-free internet browsing environment.
How Does it Work?
- System Preparation: The script begins by updating your system to ensure all software is current, reducing potential vulnerabilities.
- Dependency Installation: It installs necessary software including Pi-hole for ad-blocking, Unbound for DNS resolution, Tor for traffic anonymity, and others to manage network services.
- DNS Configuration with Unbound:
- Sets up Unbound as your local DNS server with DNSSEC validation, enhancing DNS security by ensuring the integrity and authenticity of DNS responses.
- Configures Unbound to forward DNS queries through Tor for added privacy.
- Pi-hole Integration:
- Configures Pi-hole to filter out ads and potentially harmful domains, reducing exposure to tracking and improving browsing experience.
- Pi-hole is set to use Unbound for DNS resolution.
- Tor for Anonymity:
- Establishes a Tor hidden service for Pi-hole, allowing secure access to your ad-blocking service.
- All outgoing traffic, including DNS queries, is routed through Tor, effectively hiding your IP address from many, but not all, external services.
- Network Integration and Discovery:
- Uses Avahi for local network discovery, which helps in setting up peer-to-peer DNS services.
- Automatically registers with and discovers other peers running similar setups, enhancing the distributed nature of DNS resolution.
- iptables for Traffic Management:
- Configures iptables to ensure all internet traffic goes through Tor, thus preventing any accidental IP leaks.
- Rules are set to block all non-Tor traffic, ensuring privacy.
What Does it Do?
- Enhances Privacy: By routing all traffic through Tor, it anonymizes your internet presence, making it nearly impossible for anyone to trace your online activities back to your real IP address.
- Secures DNS: Provides secure and encrypted DNS queries, protecting against DNS hijacking and man-in-the-middle attacks.
- Blocks Unwanted Content: Through Pi-hole, it offers a clean browsing experience by removing ads and blocking known malicious sites.
- Peer Network: Creates or joins a network of similar systems for a distributed, resilient DNS infrastructure.
Use Cases:
- Privacy Enthusiasts: Anyone looking to maintain their privacy online, especially in environments where internet freedom is restricted or monitored.
- Security Professionals: Those needing to secure their network communications, particularly when dealing with sensitive information or working in high-risk environments.
- Home Network Administrators: To provide a private, ad-free browsing experience for all devices on a home network with an additional layer of security.
- Journalists, Whistleblowers, or Activists: Individuals who require anonymity for their online activities to protect their identity and work.
- Public Wi-Fi Users: To safely browse the internet by masking your IP and securing DNS lookups when using potentially insecure networks.
This script is ideal for anyone concerned about digital privacy, looking to reduce online tracking, or needing a secure, anonymous internet connection.
Prerequisites:
Proxmox Installed on your dedicated homelab host
Get Started:
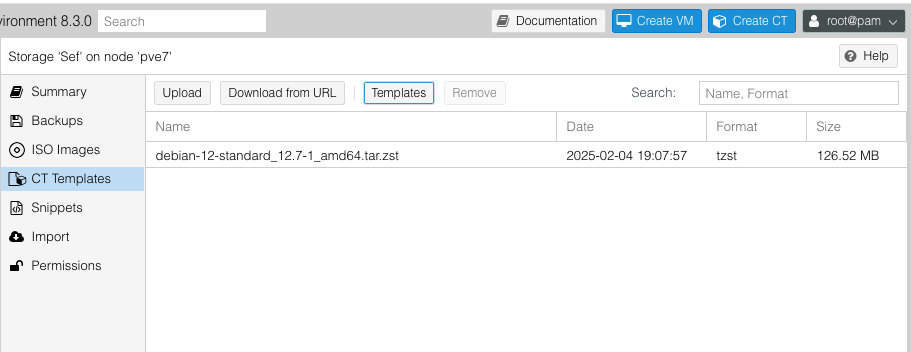
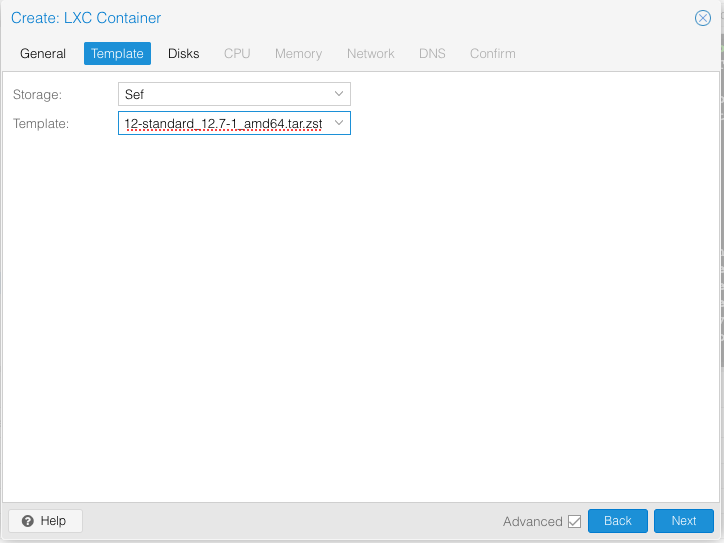
Create a new LXC container using the template Debian.
First you need to have the debian template loaded into your filesystem. Click on your filesystem → CT Templates → Templates → Debian
Now that your prerequisites are out of the way, click Create CT

Fill out your desired credentials, click next

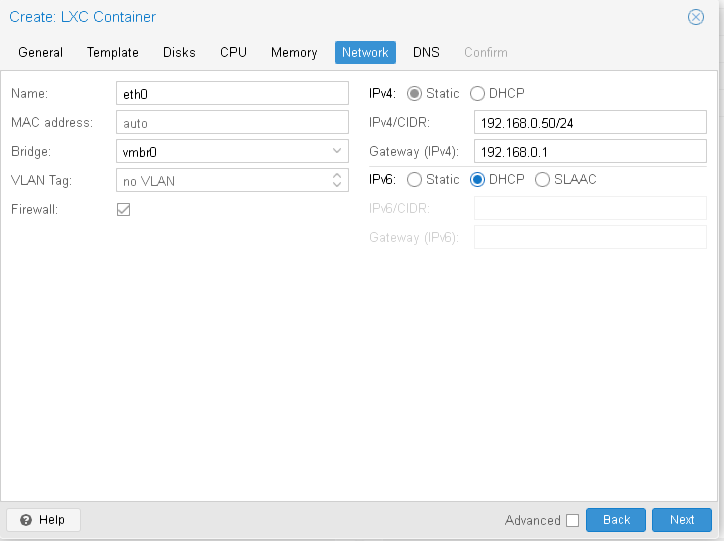
I recommend the following network config, to start. Click next
ONCE INSIDE THE LXC’s SHELL -
apt install sudo
VERSION 2.0
Version 2.0 fixes recursive DNS. Tor mode is optional, but try enabling Tor mode (Brave supports Tor mode) to see your IP address get masked without a VPN.
There’s a good chance this contains redundancies, so sorry in advance if there’s any boiler plate going on here. There’s an old saying I learned in this business - if it ain’t broke…
sudo nano deploy1.sh
APPLE + V (paste code into nano file)
deploy1.sh
#!/bin/bash
set -e

echo "zchg.org zchg.org zchg.org zchg.org zchg.org zchg.org zchg.org zchg.org"
echo " zchg.org zchg.org zchg.org zchg.org zchg.org zchg.org zchg.org zchg.org"
echo "zchg.org zchg.org zchg.org zchg.org zchg.org zchg.org zchg.org zchg.org"
echo " zchg.org zchg.org zchg.org zchg.org zchg.org zchg.org zchg.org zchg.org"
echo "zchg.org zchg.org zchg.org zchg.org zchg.org zchg.org zchg.org zchg.org"
echo " zchg.org zchg.org zchg.org zchg.org zchg.org zchg.org zchg.org zchg.org"
echo "zchg.org zchg.org zchg.org zchg.org zchg.org zchg.org zchg.org zchg.org"
echo " zchg.org zchg.org zchg.org zchg.org zchg.org zchg.org zchg.org zchg.org"

echo "[+] Updating system..."
apt update && apt upgrade -y

echo "[+] Installing dependencies..."
apt install curl

# Install Pi-hole with option to skip OS check for compatibility
sudo PIHOLE_SKIP_OS_CHECK=true curl -sSL https://install.pi-hole.net | bash && apt install -y iptables-persistent unbound tor avahi-daemon avahi-utils jq

echo "[+] Configuring Unbound..."
cat > /etc/unbound/unbound.conf <<EOL
server:
    interface: 127.0.0.1
    interface: ::1
    access-control: 127.0.0.1 allow
    access-control: ::1 allow
    port: 5335
    do-ip4: yes
    do-ip6: yes
    do-udp: yes
    do-tcp: yes
    hide-identity: yes
    hide-version: yes
    forward-zone:
        name: "."
        forward-addr: 127.0.0.1@9053
EOL

# Add DNSSEC validation to Unbound from Script 2
echo "[+] Adding DNSSEC validation to Unbound..."
cat > /etc/unbound/unbound.conf.d/pi-hole.conf <<EOL
server:
    verbosity: 1
    interface: 0.0.0.0
    port: 5353  # Changed from default to prevent conflicts
    do-ip4: yes
    do-ip6: yes
    do-udp: yes
    do-tcp: yes
    access-control: 0.0.0.0/0 allow
    access-control: ::0/0 allow
    cache-max-ttl: 86400
    cache-min-ttl: 3600
    harden-dnssec-stripped: yes
    use-caps-for-id: no
    prefetch: yes
    num-threads: 2
    so-reuseport: yes
    msg-cache-size: 128m
    rrset-cache-size: 256m
    infra-cache-numhosts: 100000
    infra-cache-lame-size: 10k
    neg-cache-size: 4m
    do-not-query-localhost: no
    hide-identity: yes
    hide-version: yes
    qname-minimisation: yes
    harden-glue: yes
    harden-below-nxdomain: yes
    target-fetch-policy: "2 1 0 0 0"
    val-log-level: 1
    tls-cert-bundle: "/etc/ssl/certs/ca-certificates.crt"
EOL

echo "[+] Configuring Pi-hole..."
cat > /etc/dnsmasq.d/02-custom.conf <<EOL
server=127.0.0.1#5335
server=::1#5335
no-resolv
EOL
systemctl restart pihole-FTL unbound

echo "[+] Configuring Tor Hidden Service..."
mkdir -p /var/lib/tor/pihole
chown -R debian-tor:debian-tor /var/lib/tor/pihole
chmod 700 /var/lib/tor/pihole
cat > /etc/tor/torrc <<EOL
HiddenServiceDir /var/lib/tor/pihole/
HiddenServicePort 53 127.0.0.1:53
HiddenServicePort 80 127.0.0.1:80
HiddenServicePort 9053 127.0.0.1:9053
AutomapHostsOnResolve 1
DNSPort 127.0.0.1:9053
TransPort 9040
SocksPort 127.0.0.1:9050

# Force all traffic through Tor
VirtualAddrNetworkIPv4 10.192.0.0/10
AutomapHostsSuffixes .onion,.exit
TransListenAddress 0.0.0.0
DNSListenAddress 0.0.0.0
EOL

echo "[+] Restarting Tor..."
systemctl restart tor

echo "[+] Enabling Avahi for local discovery..."
systemctl enable avahi-daemon
systemctl restart avahi-daemon

echo "[+] Waiting for Tor Hidden Service to be available..."
sleep 20
ONION_ADDR=$(cat /var/lib/tor/pihole/hostname)

echo "[+] Registering local and remote peers..."
PEER_FILE="/etc/pihole/nodes.conf"
avahi-browse -rt _pihole._tcp | grep "=" | awk '{print $6}' > $PEER_FILE
echo "tor://$ONION_ADDR" >> $PEER_FILE

while read -r NODE; do
    echo "Discovered node: $NODE"
    curl -s "http://$NODE/peers" >> $PEER_FILE || true
done < $PEER_FILE

echo "[+] Updating Unbound configuration..."
UNBOUND_CONF="/etc/unbound/unbound.conf"

# Ensure localhost queries are allowed
sed -i 's/do-not-query-localhost: yes/do-not-query-localhost: no/g' $UNBOUND_CONF

# Remove any existing forward zone configuration to prevent duplication
sed -i '/forward-zone:/,/^$/d' $UNBOUND_CONF

# Add new forward rules
cat >> $UNBOUND_CONF <<EOL
forward-zone:
    name: "."
    forward-addr: 127.0.0.1@9053
EOL

echo "[+] Restarting Unbound..."
systemctl restart unbound

echo "[+] Installing iptables-persistent..."
apt install -y iptables-persistent

echo "[+] Configuring iptables to force all traffic through Tor..."
iptables -F
iptables -X
iptables -t nat -F
iptables -t nat -X

# Allow local traffic
iptables -A OUTPUT -o lo -j ACCEPT

# Allow Tor process to connect to the internet
iptables -A OUTPUT -m owner --uid-owner debian-tor -j ACCEPT

# Redirect DNS requests to Tor
iptables -t nat -A OUTPUT -p udp --dport 53 -j REDIRECT --to-ports 9053
iptables -t nat -A OUTPUT -p tcp --dport 53 -j REDIRECT --to-ports 9053

# Redirect all traffic to Tor except local (127.0.0.1) and LAN (192.168.0.0/16)
iptables -t nat -A OUTPUT -d 127.0.0.1 -j RETURN
iptables -t nat -A OUTPUT -d 192.168.0.0/16 -j RETURN
iptables -t nat -A OUTPUT -p tcp --syn -j REDIRECT --to-ports 9040

# Drop all non-Tor traffic to prevent leaks
iptables -A OUTPUT -m state --state ESTABLISHED,RELATED -j ACCEPT
iptables -A OUTPUT -j REJECT

# Save iptables rules
iptables-save > /etc/iptables/rules.v4
echo "[+] iptables rules set!"

iptables -F
iptables -t nat -F
iptables -t nat -A OUTPUT -p tcp --dport 80 -j REDIRECT --to-port 9040
iptables -t nat -A OUTPUT -p tcp --dport 443 -j REDIRECT --to-port 9040
iptables -t nat -A OUTPUT -p udp --dport 53 -j REDIRECT --to-port 9053

iptables-save > /etc/iptables.rules

netfilter-persistent save
netfilter-persistent reload
systemctl enable netfilter-persistent

echo "[+] Script completed."

sleep 5

reboot
chmod +x deploy1.sh
sudo ./deploy1.sh
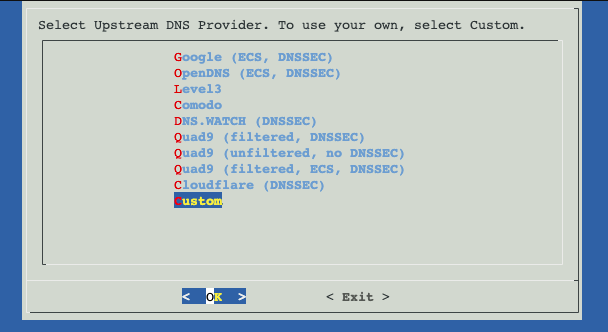
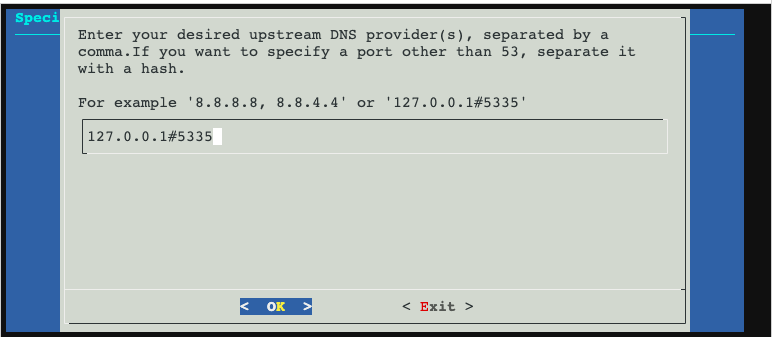
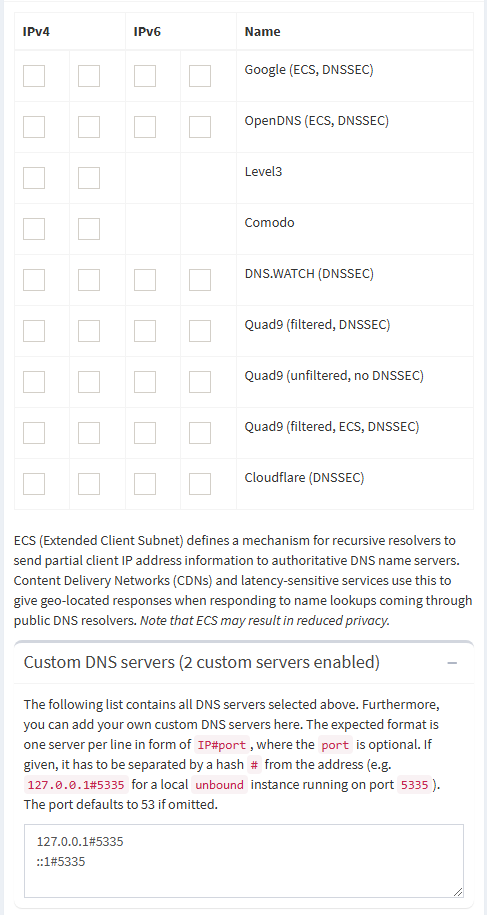
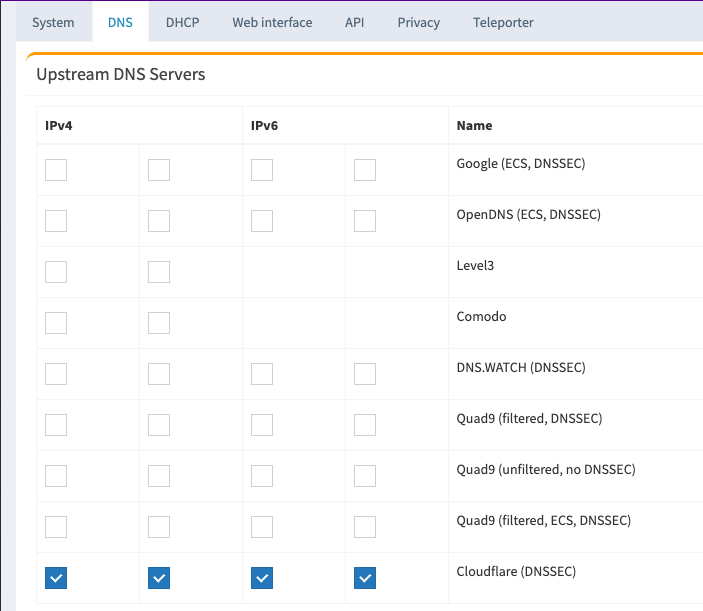
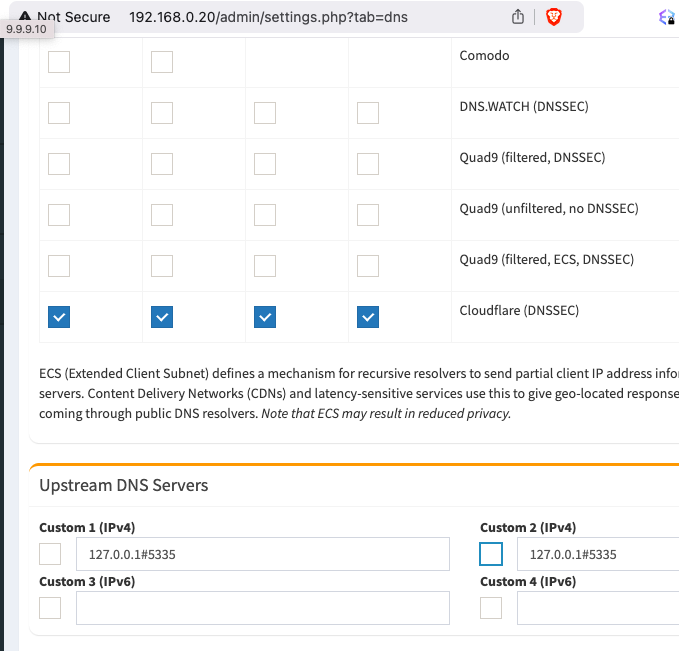
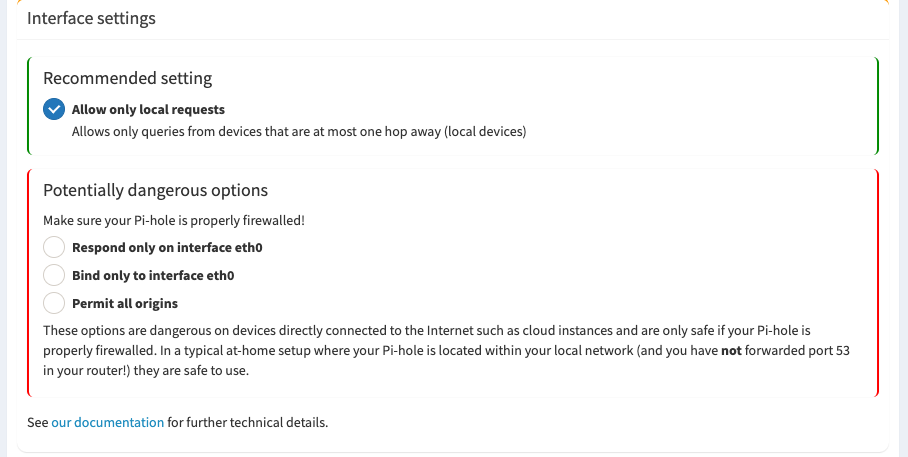
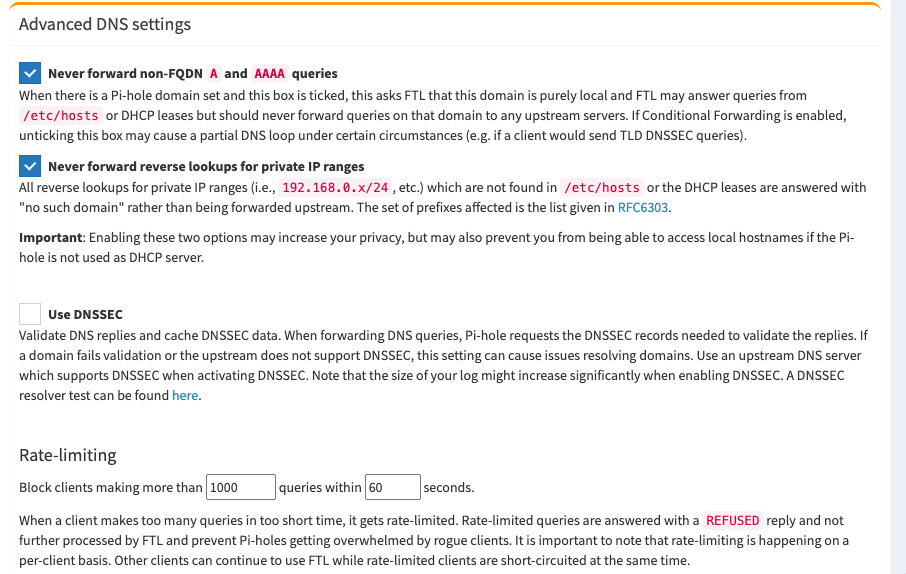
Now for PiHole default everything, except for upstream DNS you will select custom, then fill it out like so. YOU MUST DO THIS if you want recursive DNS!
DON’T FORGET TO WRITE DOWN YOUR PASSWORD!
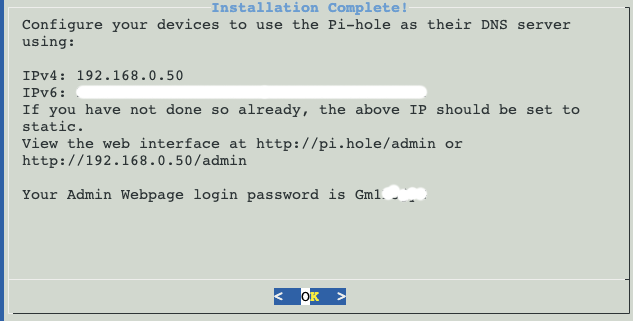
… but if you do forget your password, you can later use command
pihole setpassword [pwd]
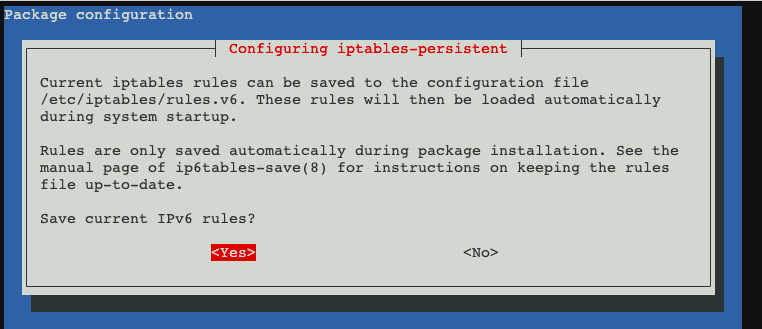
Yes to both IPV4 and IPV6, which again is simply your default:
Once complete, open the IPV4 in the URL bar of browser on your other computer. PLEASE NOTE: YOU MUST BE IN PRIVATE (INCOGNITO) MODE to guarantee operation. That’s easy, just right click Brave (Chrome) → New Private Window. In my case the URL (from the screenshot above) was 192.168.0.50/admin, but your might have chosen a different static IP address (again, from above)
You should now have DNSSEC, tor, and no DNS leaks, especially if your IPV4 address (Pihole Container) is the sole DNS provider for your client.
deploy2.sh
#!/bin/bash
set -e

echo "[+] Updating system..."
apt update && apt upgrade -y

echo "[+] Installing dependencies..."
apt install -y curl unbound tor

echo "[+] Configuring Unbound for DNS over Tor..."
cat > /etc/unbound/unbound.conf <<EOL
server:
    interface: 127.0.0.1
    port: 5335
    do-ip4: yes
    do-ip6: yes
    do-udp: yes
    do-tcp: yes
    hide-identity: yes
    hide-version: yes
    do-not-query-localhost: no
    harden-glue: yes
    harden-dnssec-stripped: yes
    harden-large-queries: yes
    harden-referral-path: yes
    harden-short-bufsize: yes
    harden-algo-downgrade: yes
    harden-below-nxdomain: yes
    use-caps-for-id: no
    aggressive-nsec: yes
    qname-minimisation: yes
    val-clean-additional: yes
    prefetch: yes
    prefetch-key: yes
    so-rcvbuf: 8m
    so-sndbuf: 8m
    num-threads: 4
    target-fetch-policy: "5 5 0 0 0"
    val-permissive-mode: no
    cache-min-ttl: 5
    cache-max-ttl: 86401
    serve-expired: no
    rrset-roundrobin: yes
    val-clean-additional: yes
    tls-cert-bundle: /etc/ssl/certs/ca-certificates.crt
#    tls-use-sni: yes

    # Route ALL Uncached Queries via Tor (Cloudflare through Tor)
    forward-zone:
        name: "."
#        forward-tls-upstream: yes
        forward-addr: 127.0.0.1@9053  # Force all queries through Tor's DNSPort
        forward-addr: ::1@9053 # Force all IPV6 queries through Tor's DNSPort

remote-control:
        control-enable: no
EOL

echo "[+] Configuring Tor for DNS resolution..."
cat > /etc/tor/torrc <<EOL
SocksPort 9050
DNSPort 9053
AutomapHostsOnResolve 1
VirtualAddrNetworkIPv4 10.192.0.0/10
AutomapHostsSuffixes .onion,.exit

# Route Cloudflare's DoH and DoT requests via Tor
MapAddress 1.1.1.1 10.192.0.1
MapAddress 1.0.0.1 10.192.0.2
MapAddress 2606:4700:4700::1111 10.192.0.3
MapAddress 2606:4700:4700::1001 10.192.0.4
EOL

echo "[+] Restarting Tor and Unbound..."
systemctl restart tor unbound

echo "[+] Setting up permanent iptables rules for DNS..."
iptables -t nat -A OUTPUT -p udp --dport 53 -j REDIRECT --to-ports 5335
iptables -t nat -A OUTPUT -p tcp --dport 53 -j REDIRECT --to-ports 5335

echo "[+] Saving iptables rules..."
iptables-save > /etc/iptables/rules.v4
netfilter-persistent save
netfilter-persistent reload

echo "[+] Your DNS queries are now being routed through Tor for privacy."

sleep 5

reboot
chmod +x deploy2.sh
sudo ./deploy2.sh
UPDATE: As of the latest update of Pihole on 2/19/25, Local DNS is not always remembered from installation. You will need to manually copy and past the following after installation assuming you are an unfortunate victim of chance.
127.0.0.1#5335
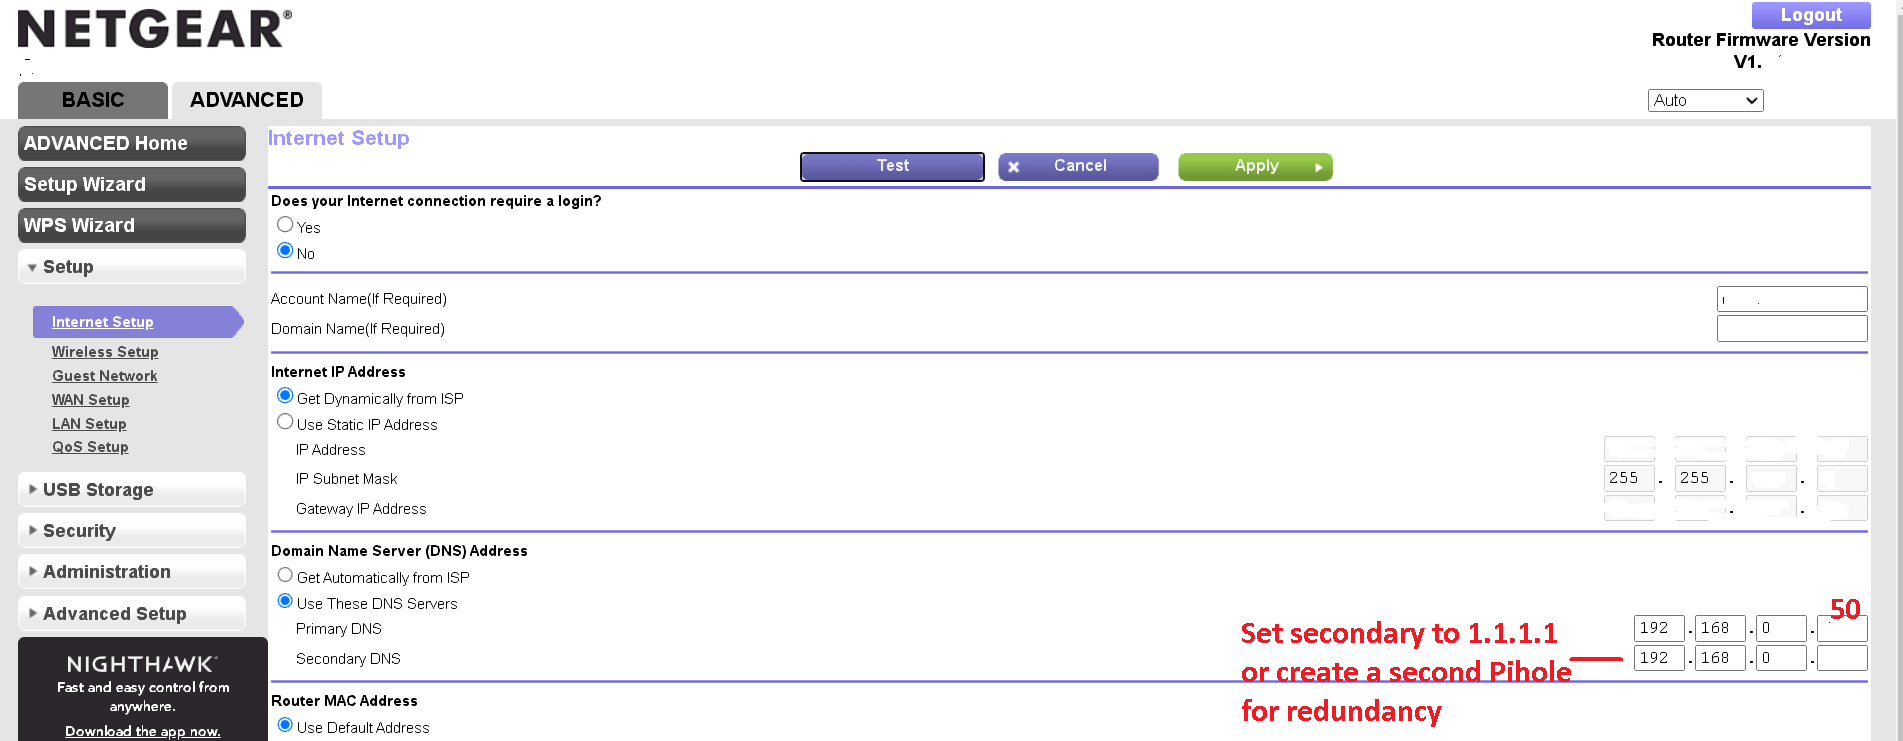
Point Your Router’s DNS to Your Pihole
Now go to your router’s URL. This is usually 192.168.0.1 OR 192.168.1.1. Find your DNS settings and change your primary DNS to 192.168.0.50 as in our example (or whatever static IP you had chosen for your Pihole). You can create a second Pihole if you wish to have redundancy.
IPV6 (Advanced, optional)
Scroll down to IPV6 Support for more information)
::1#5335
Normal looks like this:

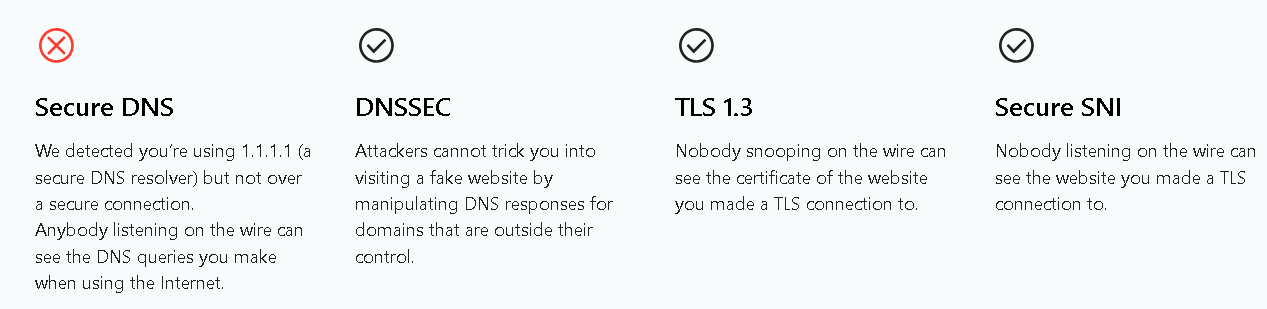
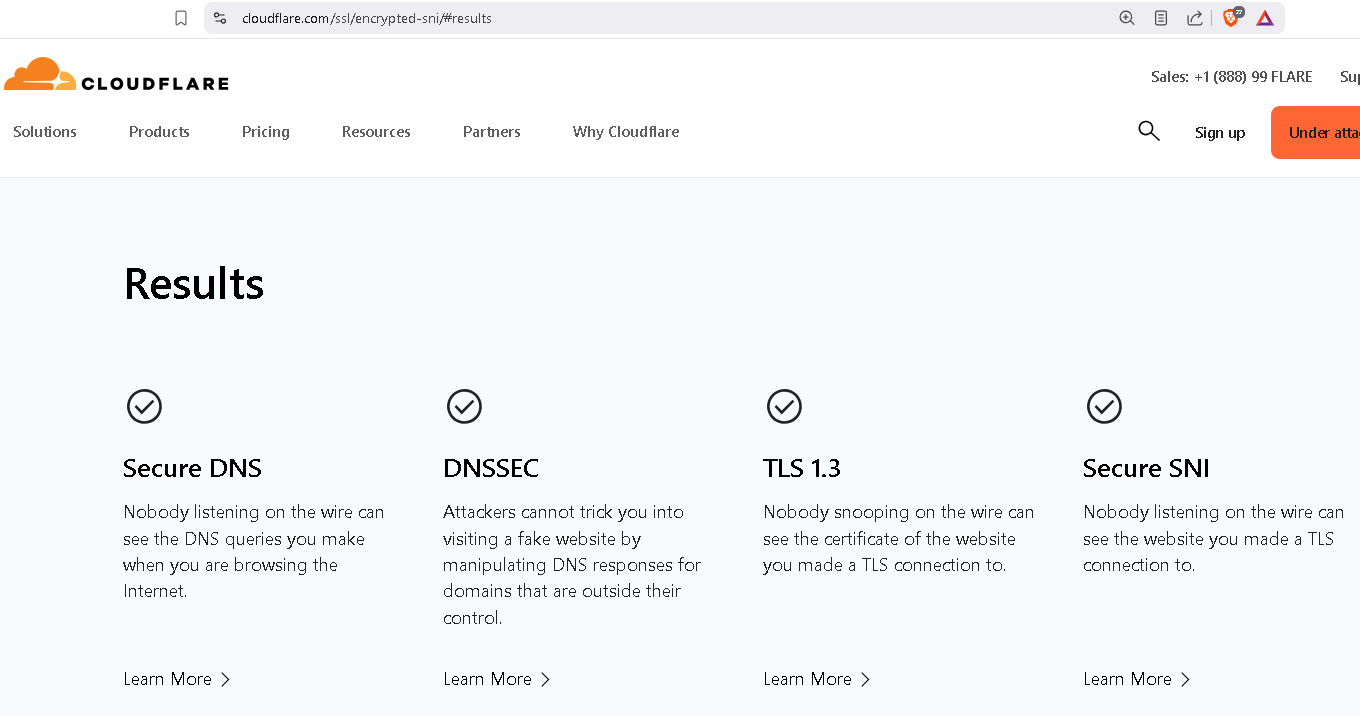
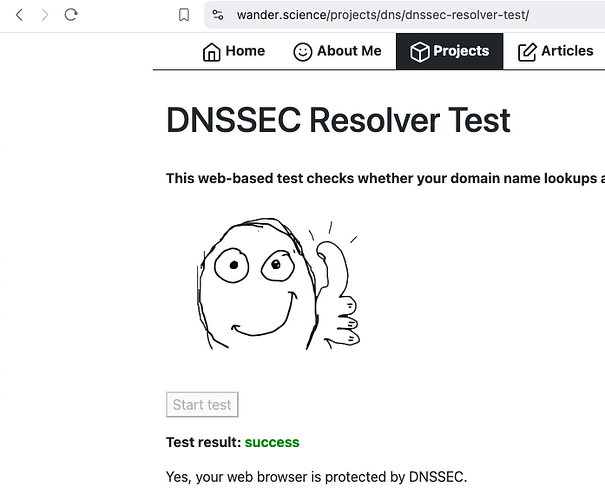
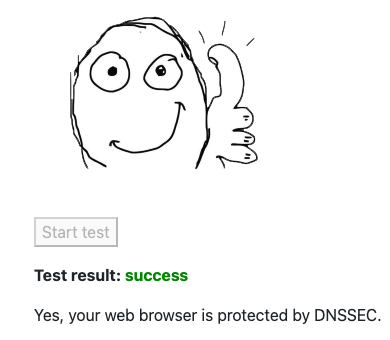
Test Results
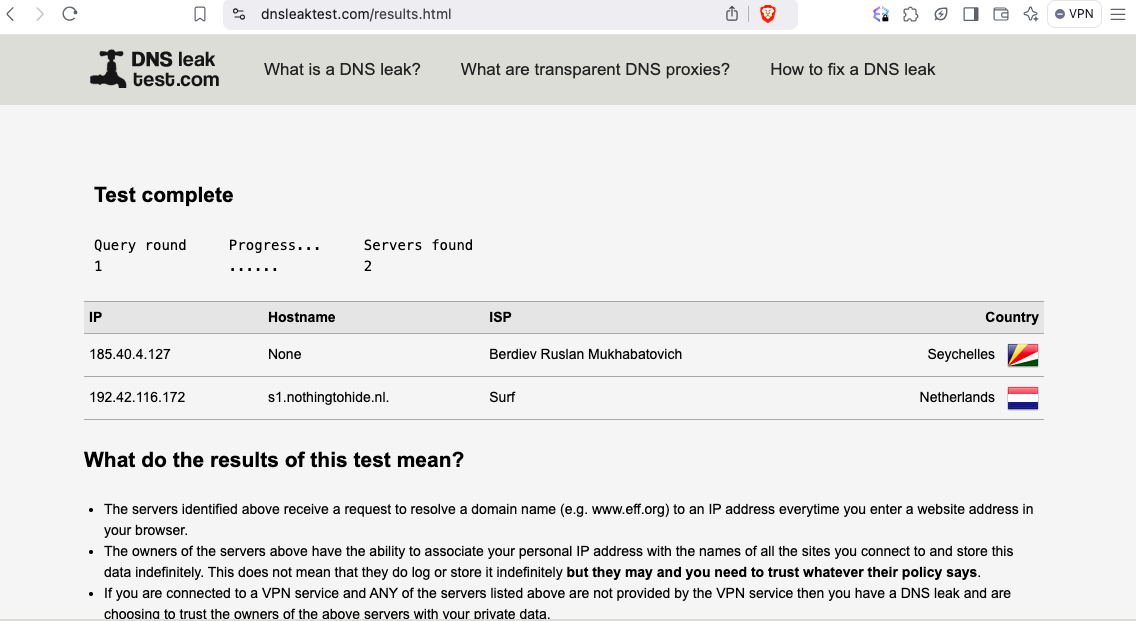
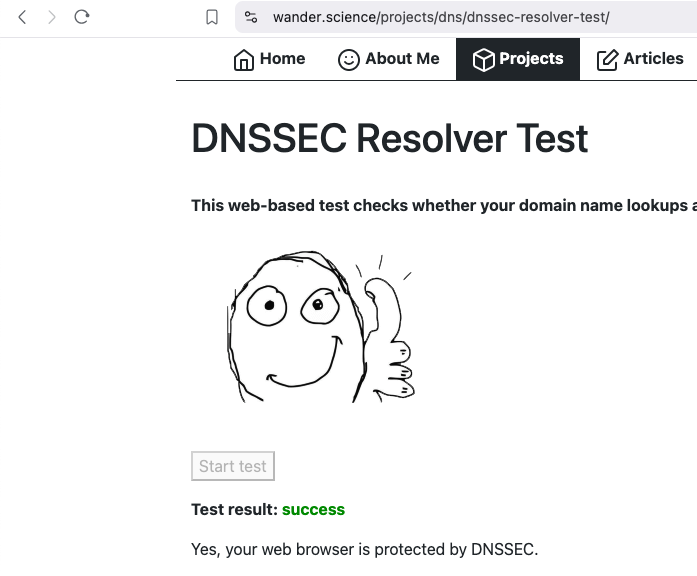
Hey Megaman, you did it. Don’t forget to lock your gate.

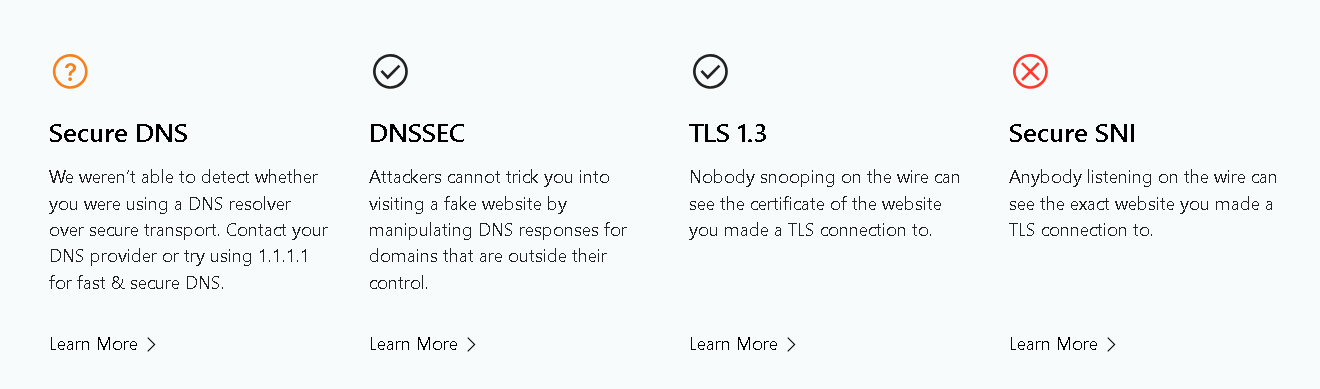
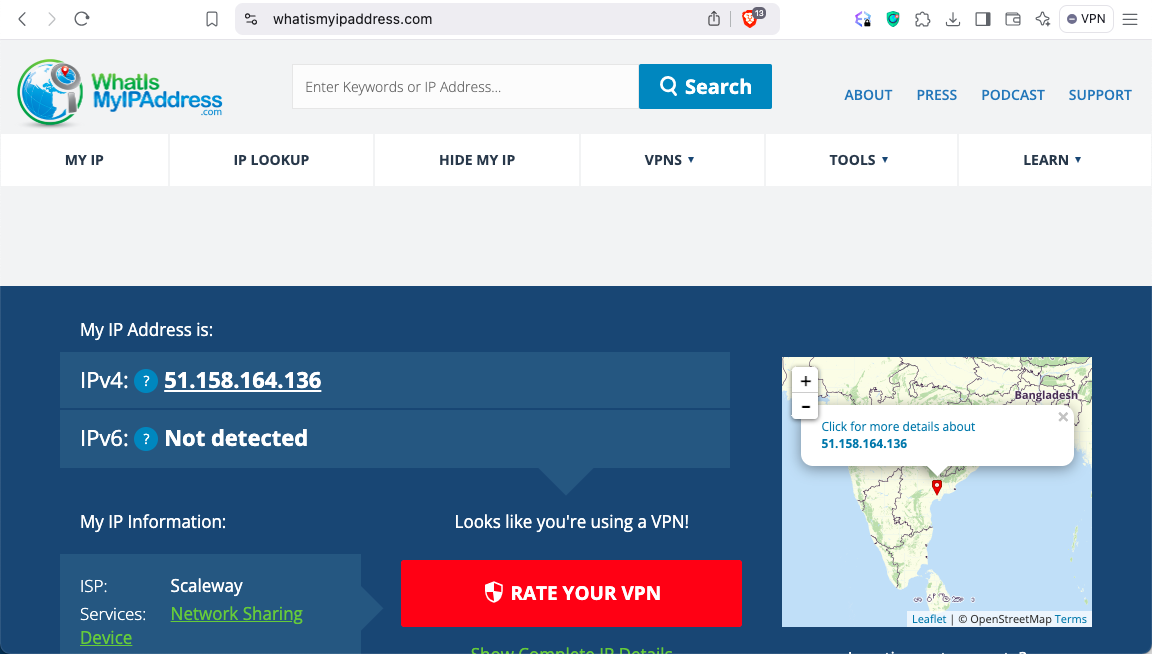
It’s Not Perfect…
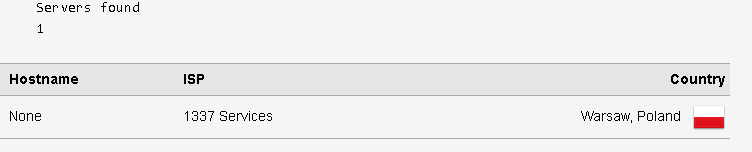
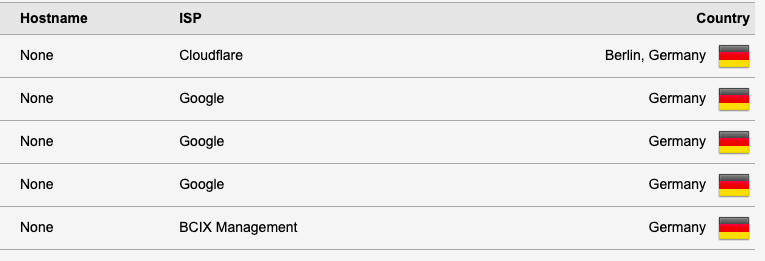
Now you should be shielded much from your spying ISP, and maybe even from Cloudflare, but you are still not completely anonymous. In addition to various leaks which are difficult to track down unless you are an expert, you will need a VPN to cover prying eyes from seeing what this insightful tool sees:
I utilize VeePN for proof of concept. Greetings from India!
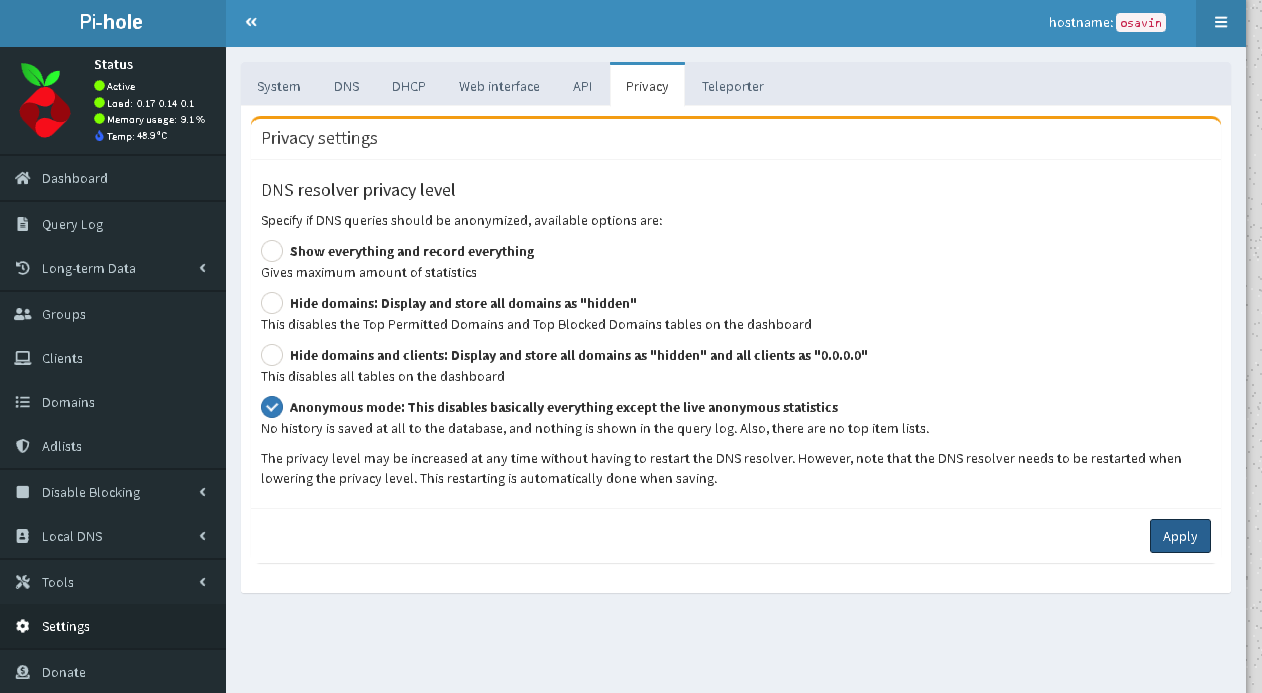
OPTIONAL: Go easy on your Hard Drive (Turn off logging):
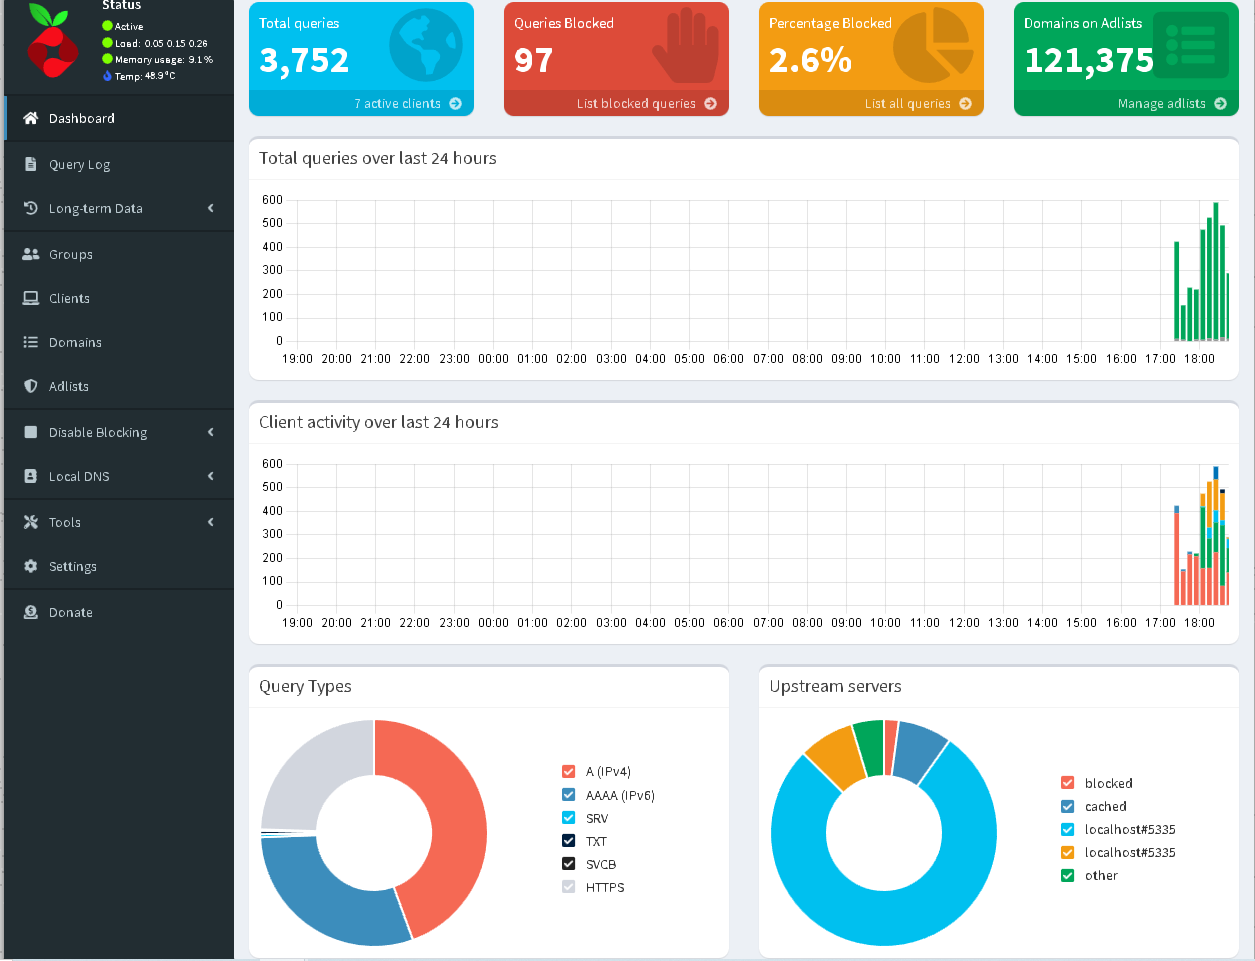
Did I mention it’s faster than snot?
Since you can stack LXC’s to your heart’s delight, TOR is no longer associated with slow ping times. The screenshot was captured on my laptop on an old 802.11n network!


IPV6 Support
For IPV6 support, don’t forget to add the following to your list of custom DNS hosts…
::1#5335
A common approach is establishing your IPV6 address as static. I sort of abhor IPV6. It’s supposed to be native DHCP but you need to have a static IPV6 to guarantee things will play nice? Backwards… NEwhoosies…
It really is optional to set up IPV6. Proceed only if you are advanced…
If you followed my guide correctly, you will have assigned DHCP to your IPV6 during installation. Now it’s time to change it to a static.
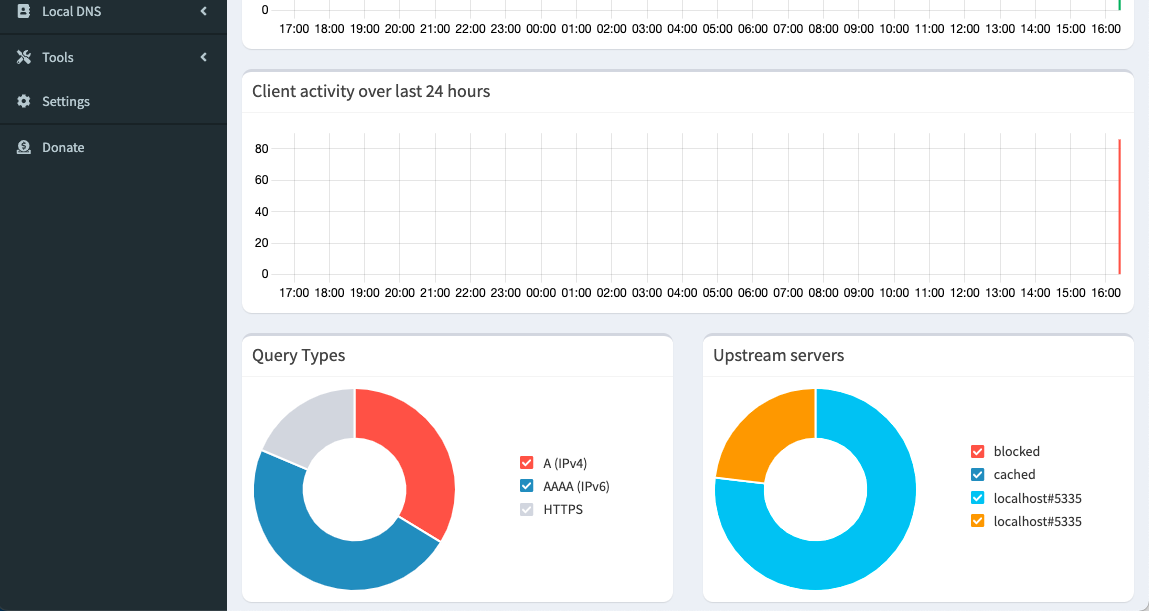
You can sniff out your DHCP IPV6 using the Pihole user interface (settings → system) and use it as your inspiration for your static IPV6…
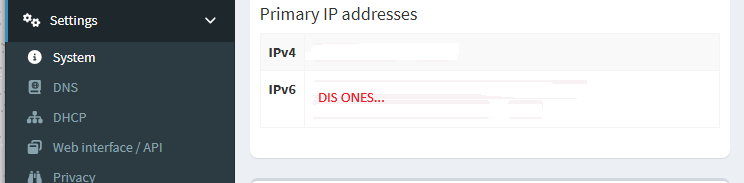
… and yes, you can also use the “ip address” command, all you old schoolies…
ip address
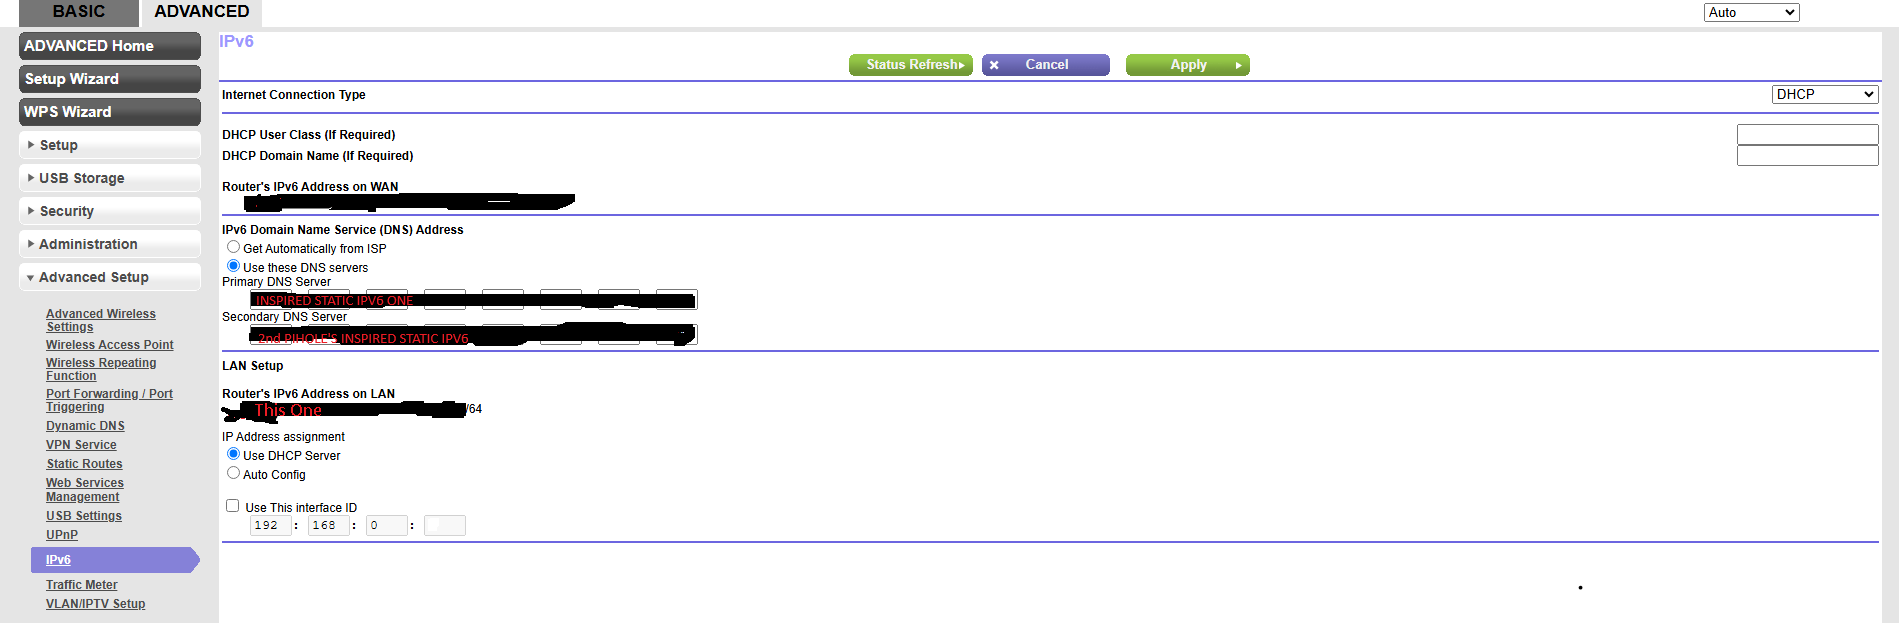
Now you can paste your inspired IPV6 into your router’s upstream DNS settings for IPV6… Note: all routers will hide this somewhere different. For my router, it was an afterthought, they added it after the thought, so it was hidden quite well…
But before restarting your router, you will need to make sure the DHCP IPV6 of the pihole is converted to a Static IP address in Proxmox:
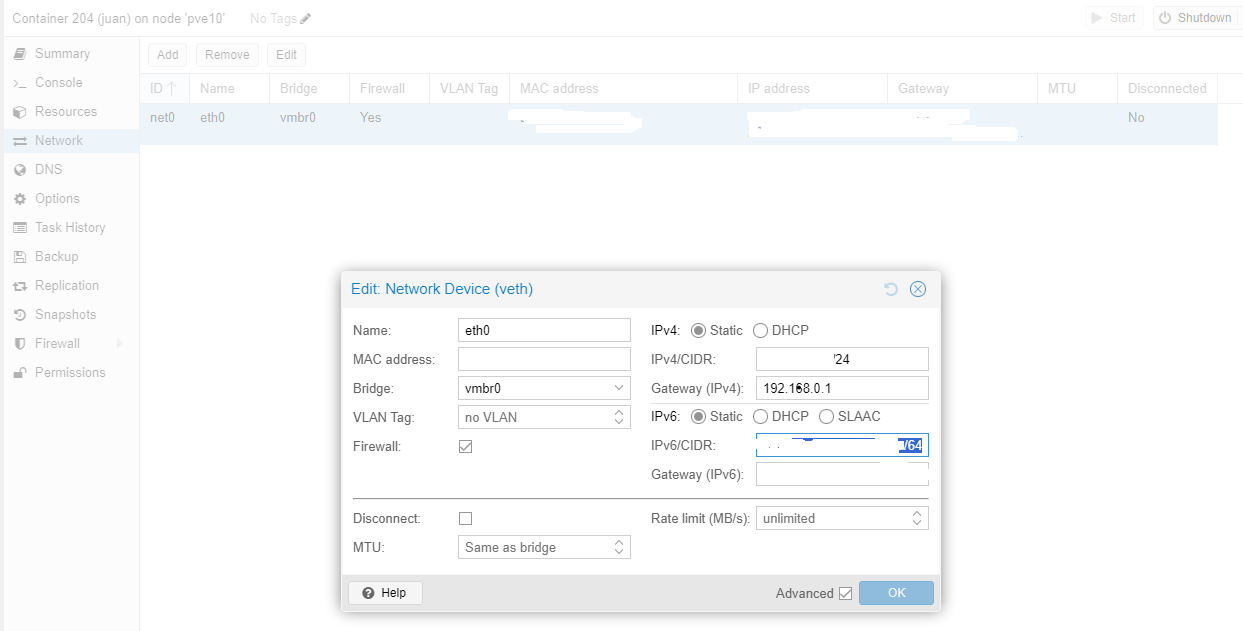
You must ADD a /64 or something like this after your Static IP address. You must REMOVE the /64 from the LOCAL IPV6 that we copied from our router’s information page in order to assign the router as your IPV6 Gateway.
Don’t forget to enable IPV6 in your Pihole’s DHCP settings…
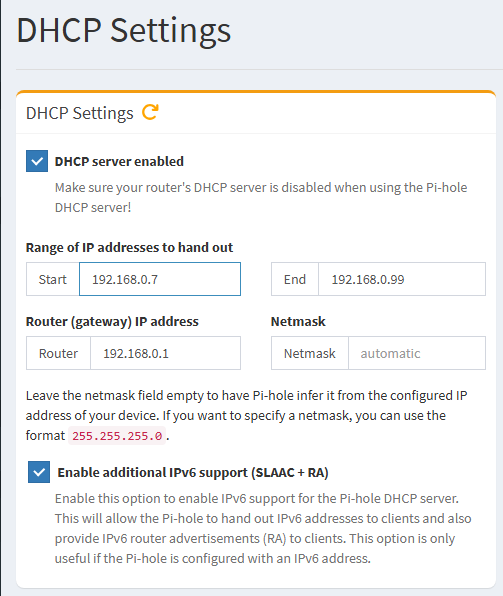
I know this isn’t proper, but I like to leave a few slots open on my router’s DHCP then assign the rest to my pihole. You can see that mutiple piholes can split DHCP so that there are in fact three DHCP servers not fighting each other. I know, I know you’re supposed to disable DHCP on your router so they don’t fight, but are they really just suggesting that so that you don’t confuse yourself? Any case, if you don’t want to go through a DNS down event destroying your whole network, consider something closer to what I’ve done here?
(for example):
Router → 192.168.0.2 - 192.168.0.7
Pihole1 → 192.168.0.8 - 192.168.0.99
Pihole 2 → 192.168.0.100 - 192.168.0.254
Something even more exciting?
Router → 192.168.0.2 - 192.168.0.254
Pihole1 → 192.168.1.1 - 192.168.1.254
Pihole 2 → 192.168.2.1 - 192.168.2.254


")